How To Use An Extension Pole With Electric Chainsaw: Tips
Pruning high branches usually means dragging out a ladder, balancing on uneven ground, and hoping for the best. An extension pole for an electric chainsaw changes that entirely—letting you make clean, precise cuts from the safety of solid ground.
The catch is that a chainsaw on a 10-foot pole behaves very differently from one held in your hands. It amplifies every mistake, magnifies kickback risk, and demands a specific technique. Here is exactly how to use an extension pole with electric chainsaw safely and effectively, based on real field experience across corded and battery models. You can also read our guide on how to store garden hose without kinks.
What an Extension Pole Is and When to Use It
An extension pole converts your standard electric chainsaw into a pole saw. It mounts to the saw head, transferring power through a drive shaft to a cutting bar at the end. This tool extends your reach by 6 to 12 feet, letting you prune overhead branches while keeping both feet planted on stable ground.
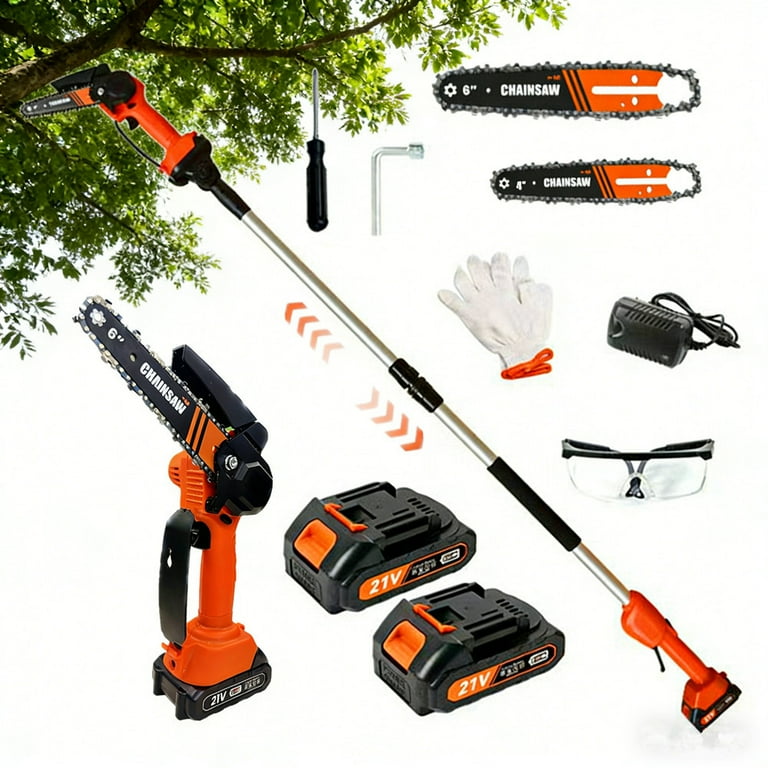 Most homeowner-grade pole saws combine a small chainsaw head with a telescoping aluminum shaft.
Source: walmart.com
When a Pole Makes Sense
- Branches up to 6 inches in diameter within one pole-length of the ground
- Routine pruning of fruit trees and ornamentals
- Cleaning up storm damage on lower limbs
- Jobs that would otherwise force you onto a ladder
When You Should NOT Use One
- Branches over 6–8 inches thick—the saw will bind, stall, or kick back
- Any work near overhead power lines, no exceptions
- Branches tangled with other limbs or hanging over structures
- Dead, brittle wood that can fracture unpredictably mid-cut
For heavier work, a different approach is needed. The American Society of Agricultural and Biological Engineers publishes guidelines on pruning tool safety that reinforce knowing your tool's limits before starting. You can also read our guide on how to fix a leaf blower that won t start.
Safety First: PPE and Job-Site Checks
A chainsaw at the end of a pole multiplies risk. The cutting bar is moving at high speed, you are looking up, and your hands are far from the action. Never start without proper protection.
Required Safety Gear
- Hard hat with face shield or safety glasses — falling branches and wood chips come straight down at you
- Hearing protection — electric models are quieter than gas, but still exceed safe limits over time
- Cut-resistant gloves — look for chainsaw-rated gloves with grip on the palm
- Long sleeves and chainsaw chaps — protects against accidental bar contact
- Sturdy boots — steel-toe work boots give you a stable base
Job-Site Assessment
Walk the area before you power anything on:
- Check for overhead power lines—if a branch touches one, call a utility company or licensed arborist, not a DIY solution
- Clear the drop zone beneath and around the branch, including pets and people
- Identify an escape path opposite the branch's natural fall direction
- Note the wind direction and speed; gusty days are not pole saw days
For corded models, always plug into a residual current device (RCD) or ground-fault circuit interrupter (GFCI). According to the U.S. Consumer Product Safety Commission's power tool guidance, earth-leakage protection is non-negotiable when working with outdoor electrical tools. The Occupational Safety and Health Administration also has electric tool safety standards worth reviewing before your first cut. For more on this, see our guide on how to use an electric pole chainsaw.
Tools and Parts You Need
Start with a complete setup to avoid mid-job frustration.
| Component | Purpose |
|---|---|
| Electric chainsaw head | The power unit—must be compatible with a pole attachment |
| Dedicated extension pole | From the same manufacturer as your saw head |
| Shoulder strap or harness | Takes weight off your arms and steadies the bar |
| Bar and chain oil | Lubricates the chain; absolutely essential |
| Spare chain + wrench | For sharpening swaps and tensioning |
| Outdoor-rated extension cord (corded models) | 14 AWG minimum for 50 ft, 12 AWG for 100 ft |
| Portable GFCI adapter | For outlets without built-in protection |
| Spare batteries (cordless models) | Pruning sessions drain packs quickly |
Pro tip from the field: Do not mix brands. An off-brand pole may physically fit your saw's mount, but the drive shaft alignment and locking mechanics often differ. A loose connection at that angle and speed can fail catastrophically.
Step-by-Step: How to Use an Extension Pole with Electric Chainsaw
This is the exact sequence used on every job, refined over years of pruning work on both homes and rental properties.
Step 1: Confirm Compatibility
Read the manuals for both the saw and the pole. Check for a clear statement that the pole works with your specific model. If the manufacturer warns against pairing them, do not force it—you will compromise safety and void warranties. For more on this, see our guide on how to use pole chainsaw.
Step 2: Inspect and Prepare
Check the bar for straightness and the chain for sharp, uniform teeth. Verify proper chain tension—it should snap back when pulled away from the bar. Fill the oil reservoir completely. Test the chain brake by engaging it while the saw is off, then with it running briefly at low throttle.
For battery models, start with a full charge—cold weather drains packs faster. For corded models, test the GFCI before plugging in your saw. For more on this, see our guide on how to use a pole chainsaw.
Step 3: Attach the Pole
Align the saw head onto the pole's drive shaft connector. Seat it fully until it clicks or locks positively. Tighten every locking mechanism according to the manual.
Perform the tug test: pull firmly on the connection point from several angles. If there is any play or movement, disassemble and start over. A loose joint at 12 feet in the air will wear the drive shaft and eventually seize.
Step 4: Adjust the Length
Extend the pole only to the length you need—one section at a time. Lock each section and tug test again. Every extension section added introduces flex and reduces your control precision. The shortest pole that reaches the branch is always the safest choice.
Step 5: Manage the Cord or Battery
For corded saws, route the cord over your shoulder, creating a strain-relief loop near the handle. Keep it behind you, clear of the bar, and never let it dangle near the cutting path.
For battery models, verify the pack clicks in securely and the contacts are clean. Carry a spare in a pocket—swapping packs in the middle of a cut is dangerous.
Step 6: Fit the Shoulder Strap
Clip the harness to the pole's balance point, typically marked with a balancing indicator. Adjust the strap so the weight of the saw settles at your shoulder, not your arms. A properly fitted strap keeps the bar steady and reduces fatigue significantly.
Step 7: Position for the Cut
Stand with your feet shoulder-width apart, perpendicular to the branch you're cutting. Extend your arms but keep your elbows slightly bent. Move the bar to the side of your body, not directly overhead. Position yourself so the branch's fall path is clear.
Step 8: Start the Saw on the Ground
Engage the chain brake. Start the saw, then disengage the brake and let the chain reach full speed. Only then raise the bar to the branch. Never start the saw with the chain already touching wood—this causes kickback and premature chain wear.
Step 9: Make the Starter Cut
Touch the chain lightly to the branch and let it do the work. Apply steady, gentle pressure—do not push or force. Watch the branch for movement or shifting weight. The smooth cut begins with a light touch.
Step 10: Relief Cuts
For branches larger than 2 inches, use the three-cut method:
- Make a shallow undercut on the bottom, 2–3 inches from the trunk
- Cut through from the top, 1–2 inches farther out from the undercut
- The top cut releases the weight, and the undercut prevents bark tearing
This sequence is an actual tree-health practice promoted by extension forestry services; the University of Minnesota Extension has guidance on proper pruning techniques that align with this approach.
Step 11: Final Pruning Cut
Once the weight is removed, make the final cut just outside the branch collar—the swollen ring where the branch meets the trunk. Do not cut flush against the trunk; this damages the tree's natural healing zone.
Step 12: Power Down
Release the trigger and engage the chain brake. Wait for the chain to stop completely before lowering the tool. Clear debris from your path and reposition only after the saw is fully stopped.
Cutting Techniques That Prevent Bind and Kickback
A pole magnifies the consequences of bad technique. Follow these principles for every cut.
Anti-Bind Moves
- Undercut first to release underside tension that causes binding
- Cut from the compression side of the branch, where pressure is greatest
- Finish with a slow pass, never a forced shove
Kickback Control
- Keep the bar tip clear of wood at all times
- Use the lower half of the bar for cutting, never the upper tip
- Wrap your left thumb around the handle and keep arms slightly bent to absorb any kick
Branch Size Guidelines
| Branch Diameter | Technique |
|---|---|
| Under 3 inches | One clean pass after a shallow undercut |
| 3–6 inches | Three-cut method, step by step |
| Over 6 inches | Use a hand saw for a kerf, then pole saw, or call a professional |
Remember: this tool is not about force. It is about correct sequence and light, consistent pressure.
Power and Cord Management for Electric Models
Corded and cordless pole saws each have distinct strengths. Choosing the right one depends on your yard's layout and job frequency.
Corded Models
- Use a heavy-duty outdoor extension cord: 14 AWG for runs up to 50 feet, 12 AWG for up to 100 feet
- Plug into a GFCI-protected outlet or use a portable GFCI adapter
- Route the cord over your shoulder for strain relief; keep slack behind you at all times
- Avoid running the cord through water or across walkways where it can be tripped on
Cordless Models
- Bring two fully charged batteries for typical pruning sessions
- Keep batteries warm in cold weather; performance drops significantly below freezing
- Clean battery contacts periodically with a dry cloth
- Charge packs indoors at room temperature for optimal longevity
In practice, cord routing is the single most common cause of stumbles and falls in the field. Take thirty extra seconds to stage your cord properly—it is a simple habit that prevents the majority of pole saw accidents.
Maintenance, Storage, and Troubleshooting
A few minutes of upkeep after each session saves an entire afternoon of repairs later.
After-Use Checklist
- Wipe the bar clean and brush wood chips from the sprocket cover
- Top off the chain oil reservoir
- Loosen chain tension slightly when storing—this extends bar life
- Inspect every pole lock for cracks, dents, or crushed sections
- Check the drive shaft connector for wear or deformation
Sharpening and Chain Care
- If the chain burns wood, produces sawdust instead of chips, or smokes, sharpen or replace it
- Lightly touch up the chain every time you refill the oil tank; full sharpen after every few uses
- Keep a spare chain on hand so you are never stuck mid-job
Storage
- Collapse the pole fully and store it in a dry, climate-controlled space
- Hang the saw head so bar oil does not pool on shelves
- Remove batteries for winter storage—store them at partial charge in a cool place
Regarding electric mower batteries—the same care principles extend to all outdoor power tools. For extension pole saws specifically, always remove the battery before cleaning or maintenance.
Common Quick Fixes
| Problem | Likely Cause | Fix |
|---|---|---|
| Chain stops mid-cut | Low battery, thermal shutdown, tripped GFCI | Swap battery, let motor cool, reset the outlet |
| Chain creeps at idle | Over-tensioned chain or worn brake band | Loosen chain tension slightly, check brake |
| Excessive vibration | Loose couplers, bar nuts, or bent bar | Tighten all connections, inspect bar straightness |
| Drive shaft slipping | Worn connector or incompatible pole | Stop immediately, re-seat or replace the pole |
Common Mistakes and How to Avoid Them
Over the years, the same handful of errors appear again and again. Avoid these and you will pass most of the learning curve instantly.
- Using an incompatible pole. Always match brand and model. A tighter fit is safer than a looser one.
- Overextending the pole. Use the shortest length that reaches the branch. Every extra extension section multiplies flex and loses torque.
- Cutting directly overhead. This puts your face and body in the fall path. Work with the bar slightly off to the side.
- Skipping the undercut. This is the number one cause of bark tearing and bar binding.
- Ignoring wind. Gusts catch the wide blade and swing branches off their natural fall path.
- Working near power lines. Never attempt it. Call the utility or a licensed arborist immediately.
Frequently Asked Questions About Extension Pole Chainsaws
Can I attach any electric chainsaw to any extension pole?
No. Only use poles designed for your specific saw model. An incompatible fit can slip, lose drive engagement, or fail completely under load.
How thick a branch can I cut with a pole saw?
Most homeowner poles handle up to 6 inches with proper technique. Larger branches require staged cuts, a hand saw first pass, or professional equipment.
Is a cordless pole saw strong enough for regular pruning?
Yes, for routine pruning of branches under 4 inches. Keep the chain sharp and carry a spare battery for uninterrupted work.
Do I need chain oil with an electric pole saw?
Yes, absolutely. Bar and chain oil provides essential cooling and lubrication. Check and fill it before every session without exception.
What is the safest way to work near fences or sheds?
Plan the fall path carefully and clear the area of anything breakable. Make smaller pieces using the relief cut method so nothing swings into structures.
Can I use a ladder with a pole saw?
No. Never use a ladder with a pole saw—the combination is dangerously unstable. If you cannot reach from the ground, hire a professional.
Why does my chain stop during long cuts?
The chain may be binding, or the motor may have hit its thermal limit. Make relief cuts to reduce load and give the motor short rests between passes.
How often should I sharpen the chain?
Light touch-ups every time you refill oil or change batteries. Replace the chain entirely when teeth become short or uneven.
Conclusion
Using an extension pole with an electric chainsaw is a skill that improves with practice. The fundamental principles are simple: plan each cut, wear protective gear, lock everything securely, and make light, staged passes. Sequence and patience will always beat force and haste.
Start with one or two easy, low branches to build confidence. Watch how the pole reacts, how your own balance feels, and how the branch falls. Move to bigger cuts only after you feel you can control the tool's every movement. If any cut feels risky, stop and call a professional.
With regular use, this ground-based approach will transform how you maintain your trees—making every pruning session safer, faster, and more precise than any ladder-and-hand-saw method ever could. Set up your saw correctly, gear up properly, and you will wonder why you ever worked any other way.