
How To Use A Chainsaw Mill: Best Guide For 2026
Milling your own lumber remains one of the most satisfying ways to turn a fallen tree into something useful. A chainsaw mill clamps onto the guide bar of a standard chainsaw and turns it into a portable sawmill you can use right where the log rests. In 2026, with lumber prices still unpredictable and live-edge furniture still popular, more homeowners are cutting their own slabs. This guide walks through the complete process: choosing the right saw and chain, setting up the first cut on rails, maintaining a steady feed technique, and drying the boards so they stay straight and stable.

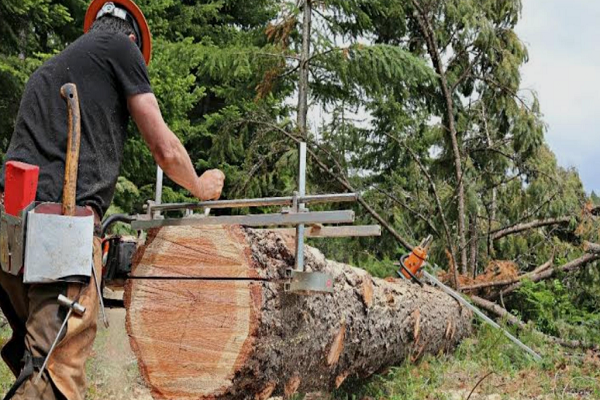
The frame clamps to the bar and sets the depth of every slab.
Image source: themakinglife.com
What Is a Chainsaw Mill and When Should You Use It?
A chainsaw mill is a metal frame that mounts to the guide bar and rides along the log or on guide rails. It controls the angle and depth of the cut, so the saw produces a flat surface instead of a round one. The result is a slab, beam, or board with a face you can later plane, sand, and use in furniture or construction. You can also read our guide on how to make a mini chainsaw mill.
Chainsaw milling makes sense when you want:
- On-site cutting: no need to haul heavy logs to a commercial sawmill.
- Oversized logs: a long enough bar can cut material too wide for stationary equipment.
- Custom sizing: you control slab thickness and work around knots, cracks, or rot.
- Live-edge projects: keeping the natural bark edge is easy when you cut the log yourself.
- Lower entry cost: a mill attachment costs a fraction of a dedicated sawmill.
It is not the best tool for every job. Processing many logs is faster on a band sawmill, which also leaves a thinner kerf. If you only need a few boards, a local sawyer may charge less per board foot than you will spend in time, fuel, and chain wear. For the hobbyist or small homesteader, however, a chainsaw mill is often the most practical route.
Types of Chainsaw Mills
Most milling work falls into one of three setups:
- Alaskan or frame mills: the classic design. The frame straddles the log, and the bar sits vertically or at a slight angle. You push the saw along rails for the first cut, then ride directly on the flat cut afterward.
- Vertical mills: the bar is mounted vertically to cut on edge, which is useful for beams and cants.
- Rail systems: a track-and-carriage setup that supports the saw over long, large logs and reduces the risk of drifting.
For a first mill, an Alaskan-style frame is the easiest to learn and the most flexible.
Safety First: Gear, Setup, and Site Checks
A chainsaw mill multiplies the risks of ordinary chainsaw work. You are cutting at awkward heights, standing close to the log, and feeding a long bar through dense wood. Follow federal safety standards for personal protection before you start the saw. You can also read our guide on best cordless leaf blowers for home use.
Essential Personal Protective Equipment
- Helmet with mesh visor or face shield: protects against kickback, chips, and falling limbs.
- Hearing protection: milling is loud enough to damage hearing in one session.
- Chainsaw chaps or pants: the fibers jam and stop the chain if it touches your leg.
- Cut-resistant gloves: needed for handling logs, wedges, and sharpening files.
- Steel-toe boots with non-slip soles: rolling slabs and dropped chainsaws are real hazards.
Site Preparation
Take five minutes to prepare the ground before you cut:
- Level the log from side to side and end to end.
- Clear branches, tools, hoses, and extension cords from the walking path.
- Chock both sides of the log so it cannot roll.
- Set up a fuel station at least 10 feet from the log and any ignition source.
- Keep a first aid kit, fire extinguisher, and spare chain nearby.
A common mistake I see again and again is skipping the chocks to save time. A log can shift suddenly when internal tension releases, and that will bend the bar and turn a safe cut into a dangerous one. Treat setup as part of the work.
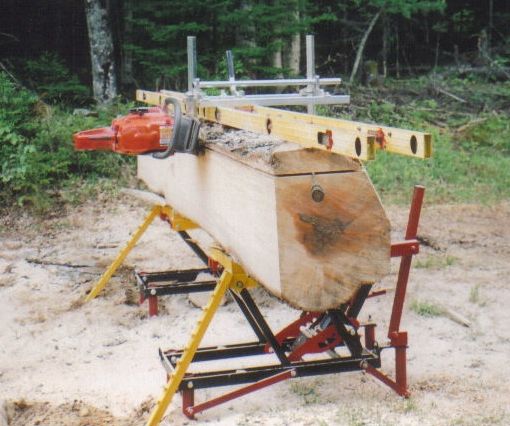
Tools within reach save fuel and mistakes.
Image source: woodgears.ca
Tools and Materials You Need
Assemble everything before you make the first cut. Here is a complete working list:
- Chainsaw mill frame sized to your bar length.
- Chainsaw with enough displacement for the log sizes you plan to cut.
- Ripping chain, or a crosscut chain filed to ripping geometry.
- Straight rails or a true aluminum ladder for the first cut.
- Screws or clamps to fix the rails to waste wood on the log.
- Plastic or aluminum wedges to keep the kerf open.
- High-tack bar oil and enough spare oil for a full day.
- Sharpening kit: round files, flat file, file guide, and depth gauge tool.
- Cant hook or peavey for rotating logs.
- End sealer or latex paint to coat fresh ends.
- Moisture meter for tracking drying.
- Stickers, or thin uniform strips, for stacking green lumber.
- Tape measure, straightedge, level, and marking tools.
- Fuel can, chain oil, and a saw tool for quick chain tension.
Keep the sharpening kit clipped to your belt. You will use it far more often than you expect, especially in dry or dirty wood. You can also read our guide on how long does a chainsaw chain last.

Check that the frame sits flat and square before you tension the chain.
Image source: grit.com
Choosing the Right Chainsaw, Bar, and Chain
Milling puts a constant load on the saw. The chain cuts along the grain, which produces many more chips and much more friction than crosscutting firewood. If the saw is too small, the bar too short, or the chain wrong, you will spend the day overheating and resharpening.
Displacement and Power
For most hobby milling, choose a saw with 60–90 cc displacement. That range delivers the torque to pull a ripping chain through solid wood at a steady speed. A 50 cc saw can handle small, soft logs with a short bar, but it will be at the edge of its limits. If you plan to mill hardwoods regularly, a 90+ cc saw is worth the investment. You can also read our guide on how long do electric lawn mower batteries last.
If your only saw is in the 40 cc class, the differences among compact saw options matter more than raw power. But for consistent results, a mid-displacement saw remains the baseline.
Gas vs. Battery in 2026
Battery-powered chainsaws have improved, but milling is an endurance job. A 60–90 cc gas saw can run all day on a few tanks of fuel, while a battery saw is limited by pack runtime and heat. For occasional small slabs, a high-voltage battery saw can work if it has enough bar length and torque. For larger logs or continuous milling, gas remains the practical choice.
Guide Bar Length
The bar must reach across the log with room to spare for the mill's mounting plates and chain clearance. A useful rule of thumb: the bar should be a few inches longer than half the log diameter. A 24-inch bar handles logs up to about 20 inches wide; a 32-inch bar handles logs up to about 28 inches. Longer bars also need more power to push through the cut.
Ripping Chain vs. Crosscut Chain
This is the biggest single upgrade you can make. A standard crosscut chain is filed at 25–35 degrees to slice across the grain. When used along the grain, it chatters, snatches, and leaves a rough surface. A ripping chain is filed to about 10 degrees, which shaves wood fibers cleanly and reduces vibration.
You can buy a ripping chain or file your existing chain to ripping geometry. Many millers prefer filing their own because it is cheap and easy to refresh in the field. Keep a spare sharpened ripping chain with you and swap it when performance drops.

A ripping chain uses a shallow 10-degree top-plate angle for smooth cuts.
Image source: grit.com
Raker Depth
Rakers, the depth gauges in front of each cutter, control how deep the cutter bites. For milling, a slightly deeper bite helps. Set rakers around 0.025 inch above the cutter top for hardwoods and around 0.030 inch for softwoods. Check them with a depth gauge every few sharpenings.
Oil Flow
Milling creates heavy friction on both the bar and chain. The automatic oiler must deliver a steady, generous stream. If you run a bar over 24 inches or cut very dry wood, consider an auxiliary oiler kit to prevent overheating and premature chain wear.
Chain Longevity
Plan to sharpen after every tank of fuel, or even sooner. Milling dulls a chain much faster than bucking. The first sign is fine sawdust instead of hook-shaped chips. In dirty or knotty wood, stop as soon as the cut feels rough.
Choosing and Preparing Logs
Good logs make good lumber. Look for logs that are:
- Relatively straight, with no serious bow or twist.
- Free of rot, insect damage, and large dead limbs.
- Not embedded with metal, nails, or wire.
- Cut slightly longer than the final lumber length so you can trim checked ends.
- Positioned at a comfortable working height for your body.
Green wood cuts more easily than air-dried wood and is gentler on the chain. Avoid logs that have been sitting for years with cracked, split ends unless you are willing to trim a lot of waste.
Step-by-Step: How to Use a Chainsaw Mill
Follow these steps in order. The first cut is the one that establishes flatness, so do not rush it.
Step 1: Prepare the Log
Roll the log onto a level area and set it at waist height. Use chocks or log dogs on both sides. Remove loose bark, mud, and stones because one grain of sand will dull the chain. Mark the end where you will stop cutting so you keep the chainsaw bar clear of dirt.
Step 2: Mark Your First Cut
The first slab is mostly waste, but the cut surface after it is your reference plane. Use a chalk line or straightedge to mark a line along the top of the log. The line should be parallel to the ground and account for the log's bow or sweep.
Step 3: Set Up the Rails
A straight, level rail is the heart of the first cut. A 6- to 8-foot aluminum ladder is popular because it is true, stiff, and easy to screw to the log. Place it along the marked line, then level it in both directions. Shim underneath until the bubble is centered. Screw or clamp it into waste wood at both ends and the middle.
Step 4: Mount the Mill on Your Saw
Switch the saw off and engage the chain brake. Attach the mill frame to the guide bar according to the manufacturer's instructions. It bolts to the bar, not the saw body. Set the depth for a light pass, just enough to flatten the top of the log. Tighten every bolt, then check chain tension again.
Step 5: Position Yourself and the Saw
Stand at one end of the log, feet shoulder-width apart, knees slightly bent. Keep your chest behind the mill and push with your legs, not your arms. Start the saw and let it reach full speed before the chain touches wood.
Step 6: Make the First Cut
Lower the mill onto the rails so the bearing surface is flat. Ease the bar into the wood and maintain a steady feed. Do not force the saw; if it bogs down, ease off and let the chain speed recover. Every 18–24 inches, tap a plastic wedge into the kerf behind the bar to stop the log from closing the cut.

Vertical milling is useful for beams and when the log is too short for horizontal passes.
Image source: norwoodsawmills.com
Step 7: Remove the First Slab
When you reach the end, rev the saw briefly to clear the kerf, then lift it clear. Remove the slab and brush off the cut face. It should be flat and smooth. If it is wavy, check the rail level before continuing.
Step 8: Set Your Target Slab Thickness
Adjust the mill's depth setting. For furniture-grade slabs, cut 2.5–3 inches thick to allow for planing, sanding, and drying movement. Shelving and panel stock can be 1.25–1.5 inches. Beams and posts should be 4 inches or thicker.
Step 9: Make the Subsequent Cuts
With a flat face established, you no longer need rails. The mill rides directly on the previous cut. Set the depth gauge to the slab thickness you want and make each pass the same way. Watch the chips: hook-shaped chips mean the chain is sharp; fine dust means it is time to stop and file.
Step 10: Stack, Seal, and Label
Move each slab to the drying stack immediately. Use stickers of uniform thickness between layers, seal the end grain within an hour, and label the stack with species and date. The care you take in the first hours matters more than almost anything later.
First Cut Rails: Methods and Tips
The first cut is the foundation for every board that follows. Any waviness or slope in this pass shows up in every slab below it.
- Use a straight ladder for short logs. Verify it is straight on a flat floor before you bring it to the site.
- Use aluminum rails for longer or wider logs. They are lighter and can be joined end to end.
- Shim, don't jam. Use thin wood shims to level the rail, then clamp and screw it.
- Check level in two directions: along the log and across the log.
- Plan for the pith. The center of the log is the most stressed area; cutting the first slab below the pith gives a cleaner face and more stable lumber.
Once the first flat face is there, rails become unnecessary. The saw's own mill rides on the fresh surface, and each pass stays parallel to the one before it.
Milling Technique: Body Position, Feed Rate, and Avoiding Bind
Good milling is rhythmic, not forceful. You are guiding the saw, not pushing it.
Body Position
Stand with feet shoulder-width apart and knees soft. Keep your center of gravity behind the cut. Push with your legs and hips so your shoulders and arms stay relaxed. This is crucial for long logs because arm fatigue produces crooked passes.
Feed Rate
The correct feed rate feels steady and continuous. You should see consistent chips flying off the chain. If the saw drops in pitch, you are feeding too hard. If you see dust, the chain is dull or you are dragging the cut. Find the pace where the saw sings at a near-constant note.
Reading the Saw's Feedback
Experienced millers listen to the saw. A constant note means the chain is sharp and the feed rate is right. A falling pitch means back off. A grinding, metallic sound means the chain is deteriorating and needs a file. Trust those cues and you will avoid most milling problems.

Consistent hook-shaped chips mean the chain is sharp and the feed rate is right.
Image source: youtube.com
Troubleshooting Common Problems
Even with good technique, problems happen. Work through the cause and fix the source, not the symptom.
| Problem | Likely Causes | Fixes |
|---|---|---|
| Cut drifts to one side | Rail not level; dull chain on one side; worn bar rails | Re-level; sharpen evenly; dress or flip the bar |
| Burn marks on the wood | Dull chain; low oil flow; too much pressure | Sharpen; clear oil ports; adjust feed rate |
| Pinched bar mid-cut | Log tension closes the kerf | Back out; tap in wedges; make a relief cut from the other end |
| Wavy slab surface | Uneven feed; out-of-true bar; uneven rakers | Steady feed; dress bar; set rakers with depth gauge |
| Heavy vibration | Loose chain; wrong filing angles; damaged tip sprocket | Re-tension; re-file; inspect and replace tip |
| Saw stumbles at full throttle | Fuel flow; air filter; ignition | Check filter and fuel line; if no luck, carburetor issues are the next suspect |
Post-Milling: Slab Care, Drying, and Storage
Green lumber is vulnerable the moment it comes off the log. End grain dries faster than the face, which creates cracks and checks. Manage the first few hours well and the rest of the drying process becomes predictable.
- Seal the ends within an hour. Use a commercial end sealer or two coats of latex paint.
- Use stickers of the same thickness, usually 3/4 to 1 inch, placed every 16–24 inches.
- Align stickers vertically so the stack is supported evenly.
- Build the stack on pallets or blocks, at least 6 inches off the ground.
- Keep it out of direct sun and rain; airflow around the stack is more important than heat.
- Weight the top with a sheet of plywood and blocks to keep slabs flat.
- Monitor moisture content with a meter. A 2-inch slab can take a year or more to dry in most climates; hardwoods dry slower than softwoods.
For small-batch drying, government forestry guidance is a useful reference. The underlying principles of stacking, airflow, and moisture control have not changed.
Maintenance and Sharpening for Better Milling
A sharp chain is the difference between a productive day and a frustrating one. Milling dulls chains so fast that sharpening becomes a routine part of the process.
- File after every tank of fuel, or whenever the saw starts producing dust.
- Keep a spacer and file guide with you so angles stay consistent.
- A ripping chain needs a 10-degree top-plate angle. When in doubt, use a guide.
- Check raker height every other sharpening, or when the cut feels grabby.
- Flip the bar every 4–6 hours of use to equalize rail wear.
- Dress the bar rails with a flat file if you feel burrs.
- Clear oil ports of sawdust before every refill.
- Check every mill bolt after each log; vibration loosens them quickly.
If the saw sits for weeks between milling sessions, fuel-system maintenance is just as important as chain care. In 2026, pump gas with ethanol can absorb moisture and cause running problems during a long day. Using cleaner fuel options or adding a stabilizer before long-term fuel storage helps the saw start clean next time.
Cost, Time, and Yield: Setting Realistic Expectations
Milling is slow, deliberate work. On a 20-inch log with a 24-inch bar, one slab can take 10–20 minutes per pass depending on species and saw power. Fuel and bar-oil consumption run higher than normal chainsaw work because the saw is under constant load.
| Log Diameter | Approximate 2-inch Slabs | Typical Kerf Loss |
|---|---|---|
| 12 inches | 4–5 | about 1/4 inch per cut |
| 16 inches | 6–7 | about 1/4 inch per cut |
| 24 inches | 9–11 | about 1/4 inch per cut |
That 1/4-inch kerf removes usable wood on every pass. Plan for it. If you need exact dimensions, add an allowance for planing and drying. A single project may only need a few logs, but if you plan to mill regularly, budget for chains, bars, oil, and fuel.
Pro Tips from the Field
- Keep three sharpened chains on hand and rotate them instead of filing mid-log.
- Mark the target slab thickness on the bar so you can double-check the mill setting quickly.
- Use a folding table near the log for fuel, files, and spare parts.
- Spray the rails with graphite or paste wax so the mill glides smoothly.
- Start each pass from the same end of the log to build rhythm.
- Stop and rest when arms tire; tired milling makes wavy slabs.
Frequently Asked Questions
Do I need a special chain for milling?
Yes. A ripping chain filed to a 10-degree top-plate angle is the right choice. A standard crosscut chain will chatter, burn, and leave a rough surface, and it will dull faster.
What size chainsaw is best for milling?
A 60–90 cc saw is the practical range for most hobby milling. Smaller saws can cut small softwood logs but will struggle with hardwoods or large diameters.
How thick should I cut slabs?
For furniture-grade tabletops, cut 2.5–3 inches thick to leave room for planing and drying movement. For shelves and panels, 1.25–1.5 inches works if the wood is stable.
How do I keep the bar from binding?
Tap plastic wedges into the kerf every 18–24 inches as you cut. Keep the log well supported, and if you are cutting a stressed log, make a relief cut from the opposite end.
How often should I sharpen?
At minimum, after every tank of fuel. If you see fine dust instead of chips, or if the saw feels like it is straining, sharpen immediately.
Can one person mill alone?
Yes, for logs up to about 16 inches in diameter and 8 feet long. Bigger logs are safer and easier with a helper who can handle wedges and watch the cut.
Conclusion
A chainsaw mill is one of the smartest investments for anyone who wants to produce their own lumber. It takes a standard saw, a straight rail, and a sharp ripping chain to turn a fallen tree into slabs, beams, and boards. The process rewards patience: level the first cut, keep the chain sharp, let the saw work at its own pace, and dry the wood properly.
Start small. Choose one manageable log, set up your rails, and make your first pass this weekend. Every slab teaches you something about the wood, the saw, and the technique. If you have a question or a first-slab story, drop it in the comments—I would love to hear how it goes.


