
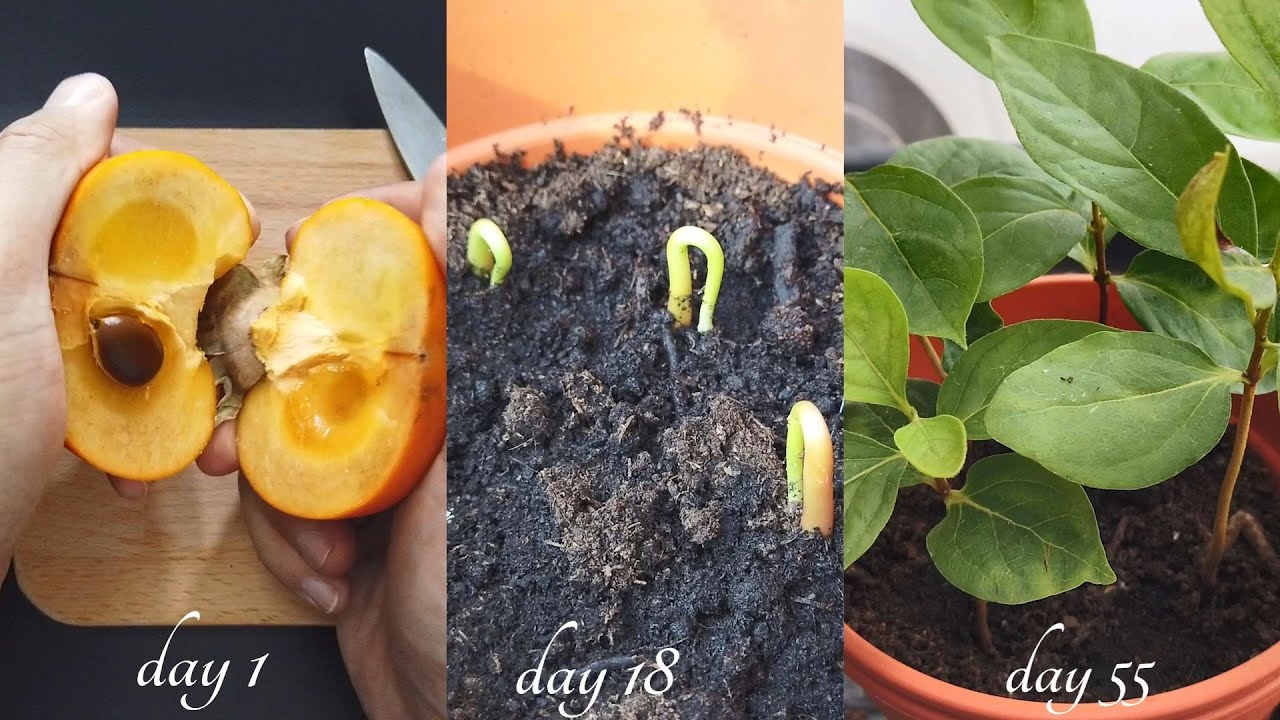
How To Sprout A Persimmon Seed: Easy Steps For 2026
Growing a persimmon tree from seed is one of the most rewarding projects a home gardener can tackle. The process is straightforward once you understand the seed’s natural rhythm: it needs a winter-like chill to wake up, then warmth to push out its first roots. This guide walks you through every step—from selecting the right fruit to transplanting a healthy sapling—so you can sprout a persimmon seed with confidence in 2026.
Why Grow Persimmons From Seed?
Growing persimmons from seed is not just about saving money on nursery trees. It’s about self-reliance, experimenting with genetics, and producing hardy rootstock for grafting. Many gardeners grow seedlings for their vigorous root systems and then graft on a named variety for reliable fruit. Others simply enjoy the gamble of what a new tree might produce. You can also read our guide on how to drain a garden hose for winter.
Both major types are worth growing:
- Asian persimmon (Diospyros kaki) — larger fruit, often self-fertile, suited to warmer zones
- American persimmon (Diospyros virginiana) — smaller, intensely sweet fruit, highly cold-hardy, and native across the eastern United States
Understanding which type you’re sprouting affects your cold stratification time, your hardiness expectations, and the eventual size of your tree. Before you start, decide whether your goal is rootstock, ornamental value, or experimental fruit production. This will shape how many seeds you plant and whether you’ll need grafting skills later.
What You Need Before You Start
Sprouting persimmon seeds requires very few materials, most of which you likely already own. The secret to success lies in prepping properly before the cold stratification period begins. You can also read our guide on how to choose the right garden hose length.
Essential Supplies
| Item | Purpose |
|---|---|
| Fully ripe persimmons | Viable seeds with good vigor |
| Fine mesh strainer | Rinsing pulp off seeds |
| 3% hydrogen peroxide (optional) | Reducing mold risk |
| Zip-lock bags | Holds seed and medium during stratification |
| Paper towels or vermiculite | Moist stratification medium |
| Deep pots or tree pots | Room for the tap root |
| Sterile seed-starting mix | Prevents damping off |
| Refrigerator | Maintains 34–41°F cold period |
Selecting the Right Fruit
The most common mistake beginners make is collecting seeds from under-ripe or store-bought fruit that lacks viable seeds. Fully ripe persimmons—soft to the touch with translucent skin—yield the best seeds. If you’re using store-bought Asian persimmons, they must contain seeds; some commercial varieties are bred to be nearly seedless.
A quick pinch test helps: firm, plump seeds that are slightly glossy are your best candidates. Thin, flat, or cracked seeds almost always fail. Unlike some seeds, a float test isn’t reliable for persimmons, so rely on visual inspection and touch. For more on this, see our guide on how to plant persimmon seed.
Step-by-Step: How to Sprout a Persimmon Seed Indoors
The entire process takes about three to four months from seed to sprout, with the bulk of that time spent in cold storage. Here’s the tested sequence:
1. Collect and Clean the Seeds
Remove seeds from the fruit and rinse them in a strainer under lukewarm water until every trace of pulp is gone. Persimmon pulp contains sugars and enzymes that promote mold during stratification. For extra safety, soak the cleaned seeds in diluted 3% hydrogen peroxide for 10 minutes, then rinse thoroughly. This step isn’t mandatory, but it dramatically reduces fungal issues.
2. Cold Stratify for 60–90 Days
Cold stratification replicates the winter dormancy persimmon seeds naturally experience outdoors. This step is non-negotiable—without it, your seeds will likely sit in soil for months without showing any signs of life. For more on this, see our guide on how to grow a persimmon from seed.
Moisten a paper towel or vermiculite until it holds moisture but doesn’t drip. Place the seeds inside, fold it over, and put it in a labeled zip-lock bag. Store at 34–41°F (1–5°C) in your refrigerator. Most seeds need the full 60–90 day window. Some stubborn batches respond to 14 days of warmth, then 90 days of cold, then warmth again—mimicking fall through spring.
3. Watch and Vent Weekly
Open the bag once a week to exchange air. Inspect for mold. If you see any, rinse the seeds in the peroxide solution, replace the paper towel or vermiculite, and return to the fridge. When the root tip emerges—a small white nub pushing through the seed coat—it’s time to move to soil.
4. Pot and Plant
Fill a deep pot with sterile, well-draining seed-starting mix. Plant the seed at a depth of 0.5–1 inch with the root tip pointing down. Water once to settle the mix and eliminate air pockets. If you’re using tree pots or deep nursery containers, you’re giving the persimmon’s tap root the straight path it needs to grow vigorously.
5. Provide Warmth and Gentle Light
Move pots to a location at 70–75°F (21–24°C). Light is unnecessary until the shoot emerges, but afterward, bright indirect light helps prevent leggy growth. A small LED grow light positioned 12–16 inches above the plant works well. Keep the soil moist but never waterlogged.
6. Begin Early Care
Once the first true leaves appear—not the cotyledons (seed leaves), but the actual foliage—feed with a balanced, dilute liquid fertilizer at half strength. Avoid disturbing the roots. Persimmons produce a fast, brittle tap root, and any damage here can stunt growth for a season or more.

Prepared seeds, bags, and stratification supplies laid out before the cold treatment begins.
Source: twopondsfarm.net
Cold Stratification, Explained
Many home gardeners assume persimmon seeds are simply slow to germinate. In reality, they’re dormant—biologically programmed to wait through winter before sprouting in spring. Cold stratification shortcuts this natural process by tricking the seed into thinking winter has passed.
Moisture balance is the make-or-break variable here. The medium should feel like a wrung-out sponge: damp enough to transfer moisture to the seed coat, dry enough that no free water pools in the bag. Too wet, and mold takes hold within days. Too dry, and the seed’s internal chemistry never shifts into the germinating phase.
The science behind this: persimmon seeds contain abscisic acid (ABA), a plant hormone that suppresses germination. Cold temperatures gradually break down ABA and increase levels of gibberellins—hormones that promote growth. This shift takes time, which is why 60–90 days is the sweet spot. Some growers stretch to 100 days for stubborn batches, especially American persimmon seeds, which can be slower than their Asian cousins.

Seedling emerging from the potting mix after successful cold stratification.
Source: youtube.com
Soil, Containers, and Light: Making the Right Choices
Persimmon seeds germinate in ordinary potting mix, but their long-term health depends on the growing medium’s structure. A sterile, airy blend of peat moss or coconut coir, perlite, and fine bark provides the ideal balance of water retention and drainage. Aim for a pH between 6.0 and 7.0; persimmons tolerate slight acidity but prefer near-neutral conditions.
The debate between short standard pots and deep tree pots has a clear winner for persimmons. These trees push a tap root straight down from day one. In shallow containers, that root hits the bottom, kinks, and begins circling—which can permanently reduce the tree’s structural stability. A deep pot—at least 10–12 inches—gives the root room to grow without disturbance. This is one area where nursery-grade tree pots are genuinely worth the investment.

Seedlings growing under LED grow lights in deep nursery pots.
Source: youtube.com
Timeline, Growth Milestones, and Early Care
Having a clear timeline helps you monitor progress and troubleshoot early. Here’s what to expect from seed to sapling:
| Phase | Timing | What Should Happen |
|---|---|---|
| Cleaning and soaking | Days 0–1 | Seeds prepped and placed in stratification |
| Cold stratification | Weeks 2–12 | Seeds remain dormant; ventilation weekly |
| Emergence | Weeks 12–16 | Root tips appear; move sprouted seeds to pots |
| Shooting | Weeks 14–20 | Shoots emerge from soil; bright indirect light |
| True leaves | Weeks 16–22 | Two to three true leaves; begin light feeding |
Persimmon seeds are naturally staggered in their germination. Don’t be alarmed if one sprout appears weeks ahead of its siblings from the same batch. This is normal genetic variation. Patience is the most valuable tool you’ll use all season.
Troubleshooting: Why Seeds Fail to Sprout
Even experienced growers hit snags. Here are the most common failures and how to fix them:
Mold in the Stratification Bag
The most frequent issue, mold develops when moisture is too high or seeds weren’t cleaned thoroughly. Rinse the seeds in diluted hydrogen peroxide, replace the paper towel or vermiculite, and reduce moisture slightly. Open the bag every three to four days instead of weekly to allow more air exchange.
No Sprout After 90 Days
Some seeds simply run slow—especially American persimmons or seeds from older fruit. Give them two to four more weeks of cold before giving up. Alternatively, move the bag to room temperature for two weeks, then return to the fridge. This warm-cold-warm cycle mimics unusual spring weather patterns and can trigger stubborn seeds.
Seed Rotting in Soil
This almost always points to overwatering or a heavy potting mix. Switch to a leaner, grittier blend with more perlite. Water only when the top inch of soil is dry—not on a fixed schedule.
Damping Off (Seedling Wilts and Collapses)
Fungal disease is devastating, but preventable. Use sterile mix, water from the bottom where possible, and run a small fan nearby for air circulation. The breeze also strengthens seedling stems. Remove any affected plants immediately—damping off spreads fast.

Healthy persimmon seedling with well-developed true leaves ready for transplanting.
Source: youtube.com
From Seed to Sapling: Transplanting and First Year Care
Transplanting at the right moment is critical. Wait until roots fill the pot but haven’t yet begun circling. To check, slide the entire root ball out gently. If the roots have formed a solid mass without circling, it’s time to move up a pot size or plant out.
Persimmon roots dislike disturbance. Never tease apart the root ball like you might with other species. Keep the tap root intact and straight in the new hole.
Hardening Off
Before seedlings face full outdoor sun, give them 7–10 days of gradual exposure. Place them outside in dappled shade for a few hours daily, then slowly increase both time and light intensity. Watch weather forecasts—a late frost or strong wind can easily kill a young seedling.
Seasonal Watering and Feeding
In the ground, water deeply but infrequently, allowing the top inch of soil to dry between sessions. Feed lightly in spring and mid-summer with a balanced fertilizer, then stop by late summer so the tree can harden off before winter.
Zone Matters
American persimmons thrive in USDA zones 4–9. Asian varieties prefer zones 7–11, though some cold-hardy cultivars exist. This difference often determines which species is worth sprouting in your region. Check your local USDA hardiness zone before committing to a species.

Young persimmon tree planted in the landscape after hardening off.
Source: youtube.com
Expectations: Genetics, Sex, and Fruiting Time
Seed-grown persimmons are a roll of the genetic dice. The fruit might be smaller, larger, sweeter, or more astringent than the parent tree. That’s the trade-off for the satisfaction of growing your own tree from scratch.
Sex is another consideration—particularly for American persimmons, which have separate male and female trees. If you’re growing a single American persimmon seedling, there’s a 50% chance it won’t produce fruit without a nearby pollinator. Asian persimmons are more forgiving; most varieties are self-fertile, though they still benefit from cross-pollination.
Fruiting Timeline
Expect to wait three to eight years for a seed-grown persimmon to fruit—longer than most grafted nursery trees, which typically start producing in two to three years. If your goal is reliable fruit quality, consider using your seedlings as vigorous rootstock and grafting on a named variety. Many growers do exactly this: sprout seeds for the sturdy, deeply-rooted base, then bud or graft a known cultivar like ‘Fuyu’ or ‘Hachiya.’

Ripe persimmon fruit hanging on a mature tree grown from a grafted seedling.
Source: twopondsfarm.net
Hands-On Lessons: Tips From Growing Experience
After raising both Asian and American persimmons from seed, a few lessons stand out above the rest.
Start more seeds than you think you need. Aim for two to three times your target tree count. Some seeds will fail, some seedlings won’t thrive, and some will turn out to be male (if you’re growing American persimmons). Starting with surplus ensures you still end up with a viable tree.
Label everything. Species, collection date, start date—write it all down. It’s remarkably easy to mix up batches in a crowded fridge, and a year later you’ll want to know which seedlings came from which seed batch.
Use deep pots from day one. This single change improved my success rate more than any other adjustment. The tap root grows straight, the tree establishes faster, and you avoid the risky root-kinking that stunts young persimmons.
Keep your fridge clean. Wipe the shelf with a mild bleach solution before your bags go in. Mold spores can linger on refrigerator surfaces, and introducing them to your stratification setup is an invitation for rot. After adopting this habit, my mold rate dropped dramatically.
If you’re planning a full garden overhaul, healthy soil is just as important as seed genetics—tending to the broader soil ecosystem gives seedlings a far better start.
Frequently Asked Questions
Do I need to cold stratify persimmon seeds?
Yes, stratification is essential. Most persimmon seeds need 60–90 days at 34–41°F to break dormancy. Without this cold period, germination rates fall drastically.
How deep should I plant the seed after stratification?
Plant 0.5–1 inch deep with the root tip pointing down. Water once after planting to settle the soil and eliminate air gaps around the seed.
Can I sprout seeds from store-bought fruit?
Yes, as long as the fruit contained viable, fully-developed seeds and was completely ripe. Clean them thoroughly and follow the same stratification process.
What temperature is best for germination after the cold period?
Keep pots between 70–75°F. This range encourages rapid germination and reduces stress on the emerging seedling.
How long until a sprouted seed becomes a tree that fruits?
Plan on three to eight years for seed-grown persimmons to produce fruit. Grafting a known variety requires less time—usually two to three years after transplanting.
Will a seed-grown tree produce fruit like the parent?
Not necessarily. Seedlings are genetically new individuals. Fruit size, sweetness, and astringency can differ significantly from the parent tree. This is normal—and part of the fun.
Can I skip hydrogen peroxide when cleaning seeds?
Yes. Plain water works fine if the seeds are exceptionally clean. Peroxide is an optional safeguard that lowers mold risk during the months of cold stratification.
Conclusion
Sprouting a persimmon seed is a study in patience and precision. Clean the seed thoroughly, hold a steady cold stratification period of 60–90 days, plant it deep in a tall pot, and keep it warm and evenly moist. Protect that tap root at every stage, harden off your seedling gradually, and accept the genetic gamble that comes with seed-grown trees.
The rewards extend well beyond germination. You gain a deeper understanding of seed dormancy, root development, and the slow, deliberate growth patterns of persimmons. Start your batch this week, track every date and observation, and you’ll be well on your way to raising a strong young tree that could outlive you. For more hands-on gardening projects, explore our growing library of practical how-to guides to keep every corner of your garden thriving.


