How To Plant Persimmon Seed: Best Guide For 2026
Growing a persimmon tree from seed is one of the most satisfying long-term projects a home gardener can start. The seeds are easy to collect, nearly free, and the tree you end up with can live for decades. But the process will not go well if you skip one crucial step: cold stratification. Without it, persimmon seeds usually sit in the soil for a full year — or never sprout at all.
This guide walks you through the entire process for the 2026 growing season, from harvesting ripe fruit to transplanting a hardy sapling. You will also learn how to handle timing, potting soil, germination problems, and the honest truth about whether a seed-grown tree will produce good fruit. You can also read our guide on how to choose the right garden hose length.
Why Grow a Persimmon From Seed?
There are easier trees to plant. Persimmons are slow to start, seed-grown trees take years to fruit, and the offspring will not be an exact copy of the parent. So why do it?
Because it is one of the few fruit trees you can grow completely from scratch. You get a genetically unique tree, often with excellent cold hardiness, and you can sample fruit that no retail nursery is selling. If you have patience, a handful of persimmon seeds can become a small orchard over a decade. You can also read our guide on how to store garden tools in small space.
The main trade-off is time. A seed-grown persimmon usually needs 5 to 8 years before it flowers and fruits. A grafted tree from a nursery often fruits in 3 to 4 years. If your only goal is fruit next season, start with a grafted tree. If you want an inexpensive, independent tree project, seed is a great route.
Know Your Persimmon Species
Before planting, know which persimmon you are dealing with. The two common species behave differently, especially when it comes to pollination, spacing, and fruit quality. You can also read our guide on how to care for lawn during dry season.
| Aspect | American Persimmon (Diospyros virginiana) | Asian Persimmon (Diospyros kaki) |
|---|---|---|
| Native range | Eastern and central United States | China, Korea, and Japan |
| Cold hardiness | Excellent, roughly USDA zones 4–9 | Warmer, roughly USDA zones 7–10; some cultivars can handle zone 6 with protection |
| Tree size | Large, often 30–60 feet tall in the wild | Smaller and more manageable, usually 15–30 feet |
| Pollination | Usually dioecious: separate male and female trees | Many named cultivars are self-fruitful |
| Fruit size | Small, typically 1–2 inches | Large, often 2–4 inches |
| Fruit use | Very astringent until fully soft; often used in puddings | Sweet or astringent, eaten fresh when ripe |
| Seed source | Foraged fruit, local wild trees, native plant sellers | Grocery fruit, specialty nurseries, garden-grown Asian cultivars |
For a baseline check of your growing zone, the USDA’s climate resources will help you decide which species is realistic for your yard.
American Persimmons
American persimmons are tough, adaptable natives. They tolerate cold winters, poor soil, and unpredictable weather better than Asian persimmons. They also produce a strongly flavored fruit that many people compare to apricot or dates when fully ripe. You can also read our guide on how to improve garden soil naturally.
The catch is pollination. American persimmons usually have separate male and female trees. A single seedling may be male and never produce fruit. If you grow one American seedling, adding a second tree improves your odds of having a female with a pollinator nearby.
Asian Persimmons
Asian persimmons are the large, orange fruits commonly found in grocery stores. Cultivars like Fuyu and Hachiya are popular because most are self-fruitful, meaning a single tree can produce fruit without a second pollinator. You can also read our guide on hole digging tool.
When you buy an Asian persimmon at the store, it may or may not contain mature seeds. Seedless varieties cannot give you seeds at all. If you find plump, fully developed seeds, they are worth planting. Just remember that a seed from a Fuyu fruit will not grow into a true Fuyu tree.
Realistic Expectations: Seedlings Don’t Clone the Parent
This is the most overlooked part of growing persimmons from seed. Persimmon trees are not true to type from seed. The tree that grows from a seed of one fruit is a brand new genetic individual. Its fruit may be larger, smaller, sweeter, more astringent, or completely different from the fruit you ate.
Seedling persimmons are also unknown in sex and quality until they mature. If you love a specific cultivar, you need to graft a known scion onto your seedling later. Grafting is not difficult, and it is the only reliable way to guarantee named fruit, especially for Asian varieties.
So treat seed growing as two possible journeys: grow a one-of-a-kind native tree, or grow a vigorous rootstock and graft a named cultivar onto it. Both are rewarding, but they require different expectations.
How Persimmon Seeds Work
Persimmon seeds have built-in dormancy. In nature, fruit falls in autumn, seeds overwinter in cool soil, and germination happens the following spring. That cold, moist period is called cold stratification. It is the single most important factor in persimmon seed germination.
Plan on 60 to 90 days of cold stratification in the refrigerator. After that, when seeds are moved to warmth (70–80°F), sprouts usually appear within 3 to 8 weeks. Some seeds take longer, and one seed may sprout while its neighbor stays dormant for another year.
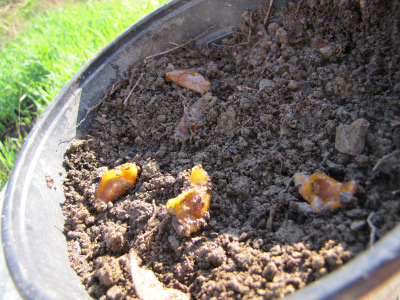
Image source: waldeneffect.org
Plump, clean persimmon seeds before going into cold stratification.
The easiest mental model is: winter first, spring second. No true cold period means no reliable sprouting.
Tools and Supplies You’ll Need
Persimmon seeds do not need much equipment, but having everything ready before you start makes the process smoother.
- Fully ripe persimmons with mature seeds
- A knife, spoon, and fine-mesh strainer
- Paper towels and a bowl of water
- 3% hydrogen peroxide for sanitizing
- Zip-top plastic bags and a permanent marker
- Sphagnum peat moss or coconut coir
- Perlite or coarse sand
- Deep tree pots, root-training pots, or fabric grow bags, at least 10 inches tall
- A refrigerator for stratification
- A heat mat and grow light for germination
- Wire cages, trunk guards, and mulch for outdoor protection

Image source: youtube.com
Most of these supplies are inexpensive, and many can be reused for seedlings and other yard projects.
Step-By-Step: How To Plant Persimmon Seed
Follow these steps in order. The biggest failures come from skipping cold stratification, using shallow pots, or letting the seeds dry out.
Step 1: Collect and Clean the Seeds
Start with fruit that is fully ripe. A persimmon that is still hard or puckeringly astringent may not have mature seeds. Choose fruit that is soft, deeply colored, and slightly wrinkled.
Cut the fruit open and squeeze or scrape the seeds out. Rinse them in a fine-mesh strainer under running water to remove the pulp. Then soak the cleaned seeds in a bowl of water for 24 hours.
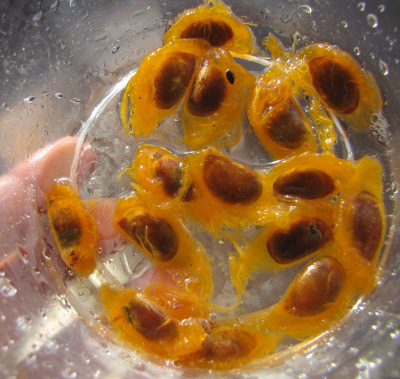
Image source: waldeneffect.org
Persimmon seeds are slippery when they come out of the fruit; a strainer makes cleaning much easier.
Step 2: Do the Float Test and Sanitize
After the soak, discard seeds that float, since they are likely hollow or non-viable. Float testing is not perfect, and some viable seeds with an air pocket will float. Use it as a rough screen rather than a hard rule.
Sanitize the remaining seeds by soaking them in 3% hydrogen peroxide for 3 to 5 minutes. Then rinse them with fresh water. This kills many of the fungal spores that cause mold during months in the refrigerator.
Step 3: Cold Stratify for 8 to 12 Weeks
Moisten peat moss or coconut coir until it feels like a wrung-out sponge. Mix the seeds into the medium, and place everything in a labeled zip-top bag. Use a permanent marker to write the date and species on the bag.
Store the bag in the refrigerator at 34–41°F. Do not put it near ripening apples or bananas. Ethylene gas from those fruits can interfere with seed dormancy.
Step 4: Check the Bag Monthly
Open the bag once a month to let in fresh air. Look for mold, which often appears as white or gray fuzz on the seeds or medium. If you see mold, rinse the seeds, replace the medium, and return the bag to the fridge.
If a seed sprouts during cold stratification, that is fine. Sow it immediately in a pot and move it to gentle warmth, even if the rest of the seeds are still dormant.
Step 5: Prepare Deep Pots and Potting Mix
Persimmon seedlings grow a long, fast taproot. That taproot is the reason shallow pots are a common failure point.
Use pots that are at least 10 inches deep. Air-pruning pots, root-training pots, and fabric grow bags are excellent choices because they stop the taproot from circling around the bottom.
Fill pots with a mix of 60% peat moss or coco coir and 40% perlite. Water the mix thoroughly, then let it drain. Do not use heavy garden soil in containers; it compacts and suffocates young roots.
Step 6: Sow the Seeds
After cold stratification ends, plant each seed 0.5 to 1 inch deep. Lay the seed flat in the soil rather than on its edge. Cover it lightly with potting mix and water gently.
Give each seed its own pot. This prevents root damage later. If you cannot use separate pots, use cell trays with deep cells and transplant before roots become tangled.

Image source: youtube.com
A young persimmon seedling in a tall pot; the depth gives the taproot room to grow downward.
Step 7: Provide Warmth and Light
Move the pots to a warm spot between 70 and 80°F. A heat mat makes this reliable, especially in late winter.
Persimmon seeds do not need light to germinate, but seedlings need strong light immediately after emergence. Bright light for 14 hours per day works best. A south-facing window can work, but a grow light gives more consistent results.
Step 8: Water Without Waterlogging
Keep the potting mix evenly moist, but never soggy. The easiest way is bottom watering: set the pots in a tray with a little water and let the mix wick up moisture. Then remove the tray and let the excess drain.
Damping off is the most common seedling killer. Good drainage, sterile mix, and airflow prevent it.
Step 9: Harden Off Before Moving Outdoors
Once all frost danger has passed, do not move seedlings straight into full sun. Set them outside in shade for a few hours each day, gradually increasing light exposure over 7 days.
This short adjustment period prevents leaf scorch and transplant shock.
Direct Fall Sowing: The No-Fridge Alternative
You do not need a refrigerator if your winters are genuinely cold. Persimmon seeds can be sown directly outdoors in fall, and nature handles the stratification for you.
Plant cleaned seeds about 1.5 inches deep in a prepared nursery bed or deep pots sunk into the ground. Cover the spot with leaf mulch and place a wire cage over it to keep out rodents and squirrels. Mark the location clearly.
In spring, remove mulch as the soil warms and watch for sprouts. This method is less controlled, and seed loss can be higher, but it is also the simplest way to grow persimmon trees. In warm-winter regions, refrigerator stratification is safer because natural winter chilling may not be enough.
Potting Mix, Depth, and Containers
Persimmon roots are more sensitive to poor drainage than many people expect. A light, well-aerated mix prevents two of the biggest problems: root rot and taproot restriction.
Use a blend of 60% peat moss or coco coir and 40% perlite for seeds and young seedlings. The mix should hold moisture while still draining freely.
The depth of the pot matters more than the pot’s width. A persimmon taproot will reach the bottom quickly, and if it hits hard plastic, it starts circling. Once that circling root begins, the tree can become root-bound and stunted for years. Deep pots, tall tree pots, or air-root-pruning containers are worth the small extra cost.
Sow seeds 0.5 inch deep in pots. Outdoors, plant them about 1 inch deep so the soil holds moisture around the seed longer.
Germination and Early Seedling Care
After cold stratification, germination usually begins 3 to 8 weeks after the soil warms. Some seeds are naturally slower, and digging them up to check is one of the fastest ways to kill them. Trust the process.
Use a heat mat to keep soil between 70 and 80°F during germination. Once seedlings emerge, move them into bright light. If they become leggy, thin, and pale, the light is not strong enough. Move the grow light closer, raise the hours of light, or add a small fan to strengthen the stems.
Fertilizer is not needed until the first true leaves appear. When you do feed, use a balanced liquid fertilizer at quarter strength. Persimmon seedlings have sensitive roots, and too much nitrogen can cause leaf burn and root damage.

Image source: treepeony.com
A healthy persimmon seedling with true leaves and a sturdy straight stem.
Transplanting and Site Selection
Persimmons need full sun. Choose a spot with at least 6 to 8 hours of direct sunlight per day. More sun improves flowering, fruit sweetness, and overall tree health.
The soil should be well drained and slightly acidic to neutral, roughly pH 6.0 to 7.5. Persimmons tolerate poor soil, but they do not tolerate standing water.
Spacing guidelines:
- Asian persimmons: 15 to 20 feet apart
- American persimmons: 30 to 40 feet apart
When planting, dig a wide hole but not a deep one. The tree should sit at the same depth it grew in the pot. Planting too deep is the most common cause of crown rot in young persimmons.
Backfill with native soil, firm it gently, and water thoroughly. Add a 2-to-3-inch layer of mulch, keeping it several inches away from the trunk. Before planting your sapling, use tools that break tough soil efficiently so you can widen the hole without greatly increasing its depth.

Image source: bhg.com
A persimmon tree planted in an open, sunny area with plenty of room to mature.
Ongoing Care for Years One to Three
The first three years determine the tree’s long-term structure. Water is the main job during year one. Aim for about an inch of water per week, from rain or irrigation. In dry weather, give the tree a deep soaking once or twice a week rather than a light daily sprinkle.
Do not fertilize heavily in the first year. If growth seems slow, the tree is usually building roots, and that is normal. In year two, a light application of balanced fertilizer in early spring is enough.
Keep weeds away from the base. They compete for moisture and can hide pests. Use a narrow weeding tool for shallow cultivation, because digging deep around a young persimmon can damage its fragile surface roots.
Mulch is your best friend. Use shredded autumn leaves or wood chips around the root zone. Keep the mulch off the trunk to prevent rot and pest damage.
If deer, rabbits, or voles are common in your area, protect the tree immediately after planting. A simple wire cage and trunk guard can mean the difference between a growing tree and a chewed-off stem. Deer browsing is the leading cause of new persimmon losses in many yards.
Pruning is minimal during these early years. Remove only dead, damaged, or crossing branches. Do not top the tree. For Asian persimmons, maintain a single central leader to create a strong shape that can support a heavy fruit load later.

Image source: youtube.com
A young persimmon tree with a single central trunk and well-spaced lower branches.
Common Mistakes to Avoid
Every one of these mistakes has ruined a persimmon planting. Learn from other people’s failures instead of your own.
- Skipping cold stratification. This is the number one cause of zero germination.
- Using shallow pots. The taproot coils, and the tree never reaches its potential.
- Overwatering. Persimmon roots rot quickly in wet, heavy soil.
- Transplanting too late. Roots that circle the pot create long-term problems.
- Expecting clone fruit. A seed-grown tree will not produce fruit identical to the parent.
- Planting too deep. Deep planting leads to crown rot and slow decline.
- Ignoring deer protection. A young persimmon is an attractive snack for deer, rabbits, and rodents.
- Rototilling near the roots. Persimmons prefer mulching and improving the soil biology over aggressive digging.
Troubleshooting and Quick Fixes
Even with good technique, issues can appear. Here is how to diagnose them quickly.
| Problem | Likely Cause | Quick Fix |
|---|---|---|
| Mold in the stratification bag | Bag too wet or stale air | Rinse seeds in peroxide, replace medium, and let the bag breathe monthly |
| No germination after warm weeks | Stratification was too short | Return seeds to the fridge for another 4 to 6 weeks, then warm them again |
| Leggy, stretched seedlings | Not enough light | Use a grow light for 14 hours a day and move it closer |
| Yellowing leaves | Overwatering or poor drainage | Let the top inch of soil dry out and improve the potting mix |
| Leaves being chewed | Cutworms, slugs, or deer | Use a collar around the trunk, handpick at dusk, and install a wire cage |
| Sudden wilting | Damping off | Use sterile mix, avoid overwatering, and increase airflow |

Image source: twopondsfarm.net
A persimmon seedling at the early green-growth stage, still small but actively developing.
Grafting and Cultivar Choice
If you want reliable fruit, graft a named cultivar onto your seedling. Seed-grown persimmons make excellent rootstock because they develop strong, deep roots. In year one or two, once the seedling trunk is roughly pencil-thick, you can graft a scion from a known variety.
A simple whip-and-tongue graft works well for matching diameters. A cleft graft works when the rootstock is larger than the scion. After grafting, keep the union protected and remove any shoots that appear below the graft line.
Grafted trees fruit significantly sooner than seed-grown trees, often in 3 to 4 years. The combination is hard to beat: strong seedling roots below, reliable named fruit above.
For variety selection, check local recommendations. Your regional extension services publish reliable information on which persimmons perform well in your area, and consulting those guides can save you years of frustration.
Frequently Asked Questions
How long does it take for a persimmon seed to sprout?
After the 8-to-12-week cold stratification period, most seeds sprout within 3 to 8 weeks after being moved to warm conditions.
Do I need to cold stratify persimmon seeds?
Yes. Cold stratification breaks dormancy and dramatically improves germination rates. Skipping it leads to poor or zero sprouting.
How deep should I plant the seed?
Plant seeds about 0.5 inch deep in pots. In outdoor beds, plant them about 1 inch deep so the soil holds moisture around the seed.
Can I plant seeds from store-bought fruit?
Yes, if the fruit was fully ripe and the seeds are mature, plump, and undamaged. Clean and sanitize them well, then cold stratify. Keep in mind that seedless store-bought varieties will not contain viable seeds.
Will the tree produce the same fruit as the parent?
No. Seedlings vary in fruit size, flavor, texture, and ripening time. To grow a specific cultivar, graft a scion from that cultivar onto your seedling.
When will a seed-grown persimmon tree bear fruit?
Typically 5 to 8 years. Grafted trees often bear fruit in 3 to 4 years.
Do I need two persimmon trees?
It depends on the species. Many Asian cultivars are self-fruitful. American persimmons usually need a nearby pollinator, and a seed-grown American tree may turn out to be male.
Should I fertilize in the first year?
Usually no. Focus on watering, light, strong roots, and protection from pests. Heavy fertilizer in year one does more harm than good.
Conclusion
You now have the complete playbook for planting persimmon seeds in 2026. The formula is simple: collect ripe seeds, clean and sanitize them, keep them cold and moist for 8 to 12 weeks, sow them in deep pots with well-draining mix, then protect the young tree from overwatering and hungry wildlife.
Start with a handful of seeds rather than just one. Persimmon germination rates are rarely 100%, and losing a few seeds is normal. Track your planting dates, species, and results in a garden notebook. What works in one climate may need small adjustments in another.
If your goal is named fruit, plan to graft in year one or two. If your goal is a unique, tough, homegrown tree, let the seedling grow and see what it gives you. Either way, the small effort you invest today will produce a tree that could outlive you.