Ginseng Digging Tools: Best Picks And Field Tips 2026
Wild ginseng is one of the most valuable plants you can harvest from the forest floor, but only if you get the root out whole. A snapped neck, a gouged body, or torn hair roots can drop a beautiful root into the low-grade pile before it ever reaches a drying screen. That is why the right ginseng digging tools are not a luxury — they are the difference between a clean, market-ready root and a broken one.
This 2026 guide covers the specific tools experienced diggers carry, how to match those tools to your terrain, and the field techniques that protect your harvest and the wild patches you plan to visit again next season. You can also read our guide on how to remove rust from garden tools.
Why the Tool Matters More Than Good Eyes
Hunters walk past more ginseng than they find, but diggers ruin more roots than they ever see. A shovel or standard garden trowel will slice through the neck before you realize the root has changed direction underground. The best digging tools for ginseng are designed for prying, slicing, and lifting — not scooping and chopping.
In practice, first-time diggers break more roots with an ordinary trowel than with any other tool. A wide blade forces you to work too close to the stem, and a thick edge cannot follow a root that twists around stones. A narrow root digger, by contrast, slides into tight seams and lets you work from the side of the root rather than straight down on top of it. You can also read our guide on boglerco vs dig dig tool.
The right kit also saves your knees and back. A day spent crouching on a rocky ridge is harder on your body than on your tools, so choose gear that lets you stay low and steady.
Know the Root Before You Dig
Wild ginseng is not a straight carrot. The root often grows horizontally, follows old root seams, and bends around rocks. Before you pick up a tool, understand the parts that matter:
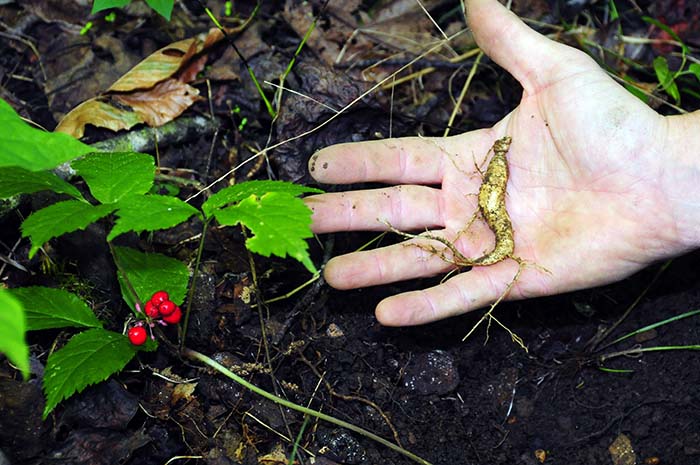
- Neck: the thin connection between the above-ground stem and the root body. Snap it and the root loses most of its value.
- Crown: the slightly wider top of the root where the neck attaches.
- Root body: the main fleshy part that buyers grade first.
- Hair roots: the fine side roots that branch off the body. They are brittle and easily torn.
A marketable root looks whole from neck to hair root. Everything you do with your digging tools should protect that connection. You can also read our guide on cape cod weeder tool.
You also need to know what is legal to dig. Most states with wild ginseng require the plant to have at least three prongs, with five leaflets per prong. If the plant does not meet that standard, leave it alone.
Legal and Ethical Harvesting: Know the 2026 Rules
Ginseng regulations are not uniform. Every state with a wild harvest sets its own season, and those dates usually fall between late summer and late fall. A few rules are common across most of the range:
- Maturity: harvest only plants with at least three prongs.
- Season: dig only during the open season in your state.
- Permission: get written permission before digging on private land.
- Public land: check for permits, quotas, or outright closures.
- Federal law: wild American ginseng is listed under CITES Appendix II, so international exports are regulated.
Because these rules change, check your state wildlife agency before every season. At the federal level, exports are overseen by federal wildlife authorities. The U.S. Department of Agriculture is also a reliable starting point for forest-management and plant conservation guidance. You can also read our guide on how to water lawn efficiently.
Ethical harvesting matters just as much as legal harvesting. Always do three things:
- Plant the ripe red berries in the same hole you just dug.
- Leave young plants with fewer than three prongs untouched.
- Refill the hole and camouflage it with leaf litter and duff.
Ginseng patches recover slowly. A digger who protects the patch is protecting the tradition for the next generation.
The 2026 Toolkit: Best Picks by Tool Category
You do not need a heavy pack full of steel. A tight, light kit beats a bulky bag every time. These are the tool categories experienced diggers rely on most:
| Tool | What to Look For | Why It Earns a Place |
|---|---|---|
| Narrow root digger | Thin, hardened-steel blade with a pointed tip | Pries around rocks and follows the neck without gouging |
| Hori-hori knife | Concave blade with one serrated edge | Slices roots and soil, cuts stems cleanly, and doubles as a small trowel |
| Three-prong cultivator | Long, round tines | Loosens the soil ring around the plant before lifting |
| Slim trowel | Narrow blade with a blunt point | Scoops soil from depth without chewing into the root |
| Hand pruners | Sharp bypass blades | Trims small roots and tough stems with a clean cut |
| Soft brush | Natural-bristle brush | Clears soil from the root so you can see the full shape |
| Paper or mesh bags | Breathable material | Keeps roots cool, dry, and separated in your pack |
| Gloves and knee pad | Durable, grippy, padded | Protects your hands and knees for longer, steadier work |

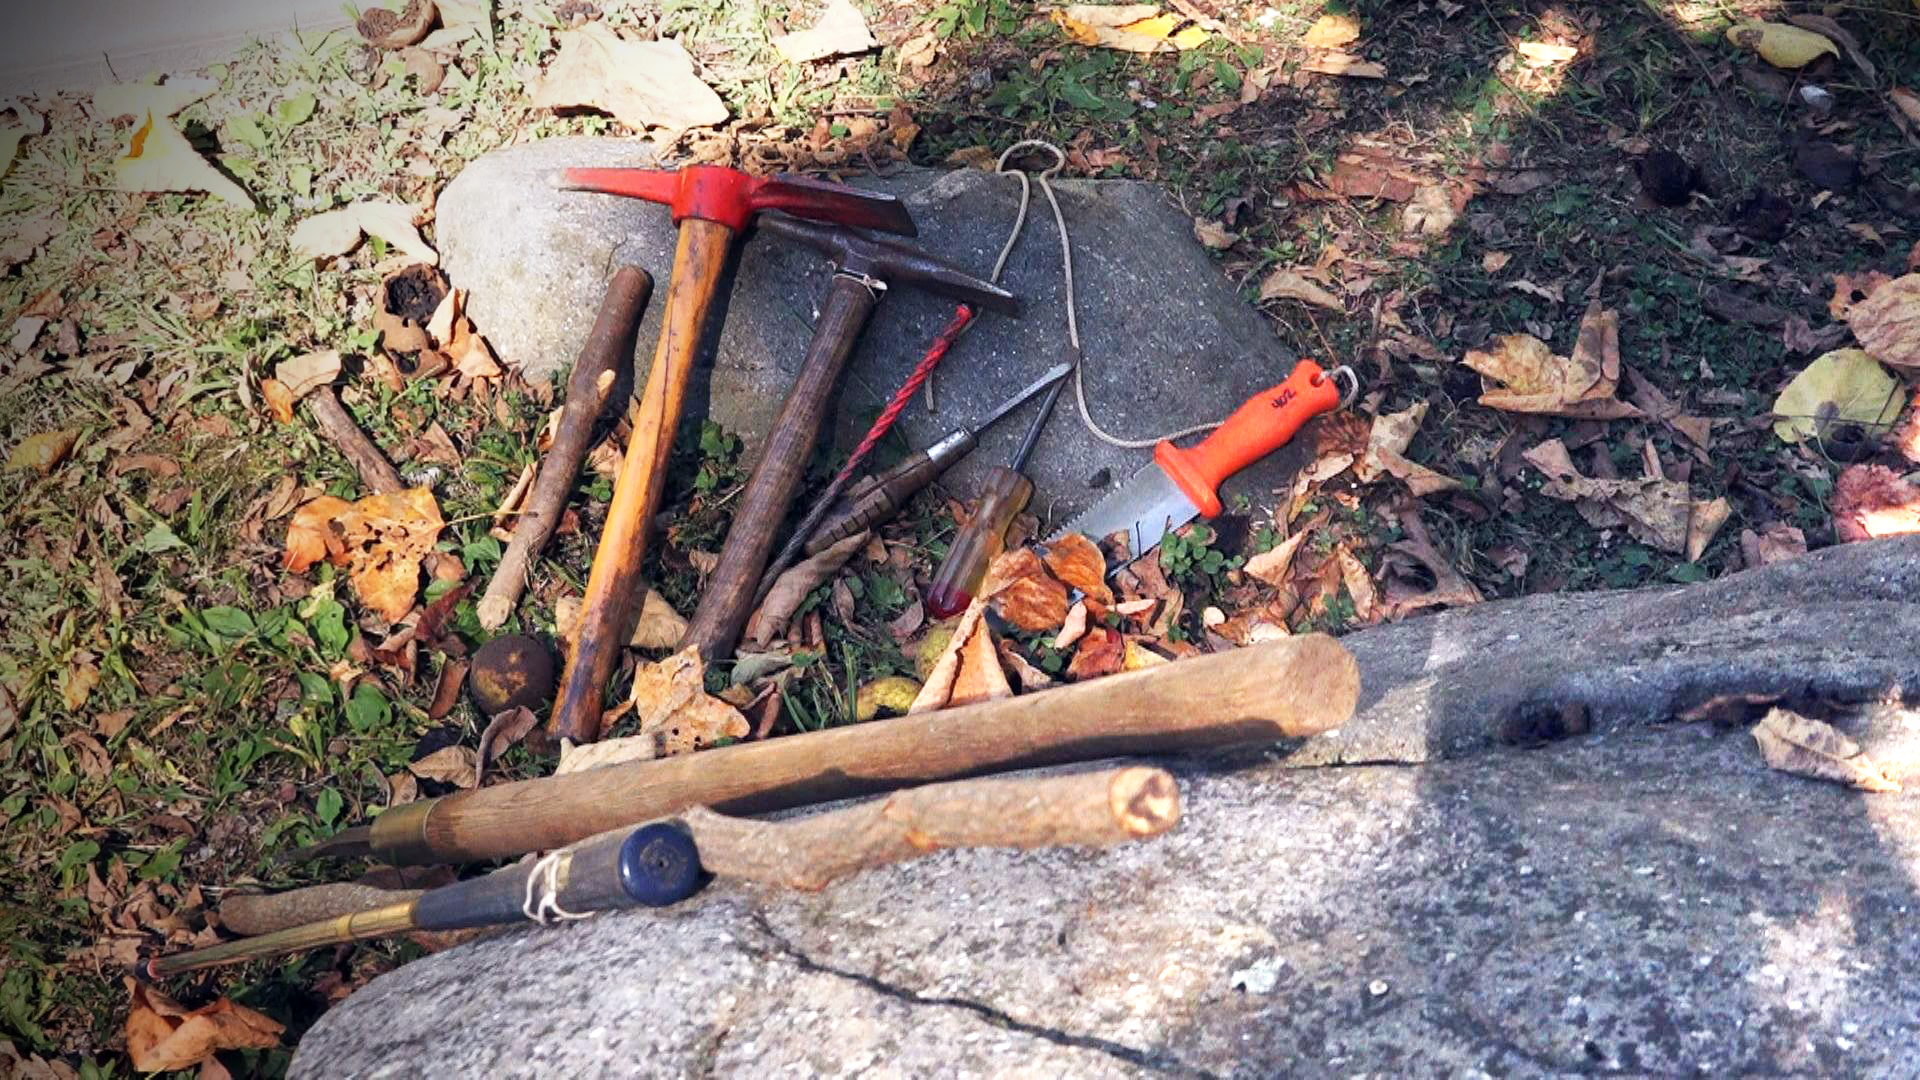
Image source: wbir.com
A compact kit, not a heavy toolbox, is all you need for a day on the ridge.
A GPS or offline map app is worth adding to your pack. It helps you mark productive patches, avoid accidental trespassing, and find your way back to the truck before dark.
Best Picks by Terrain
Your soil should dictate your tool choices more than any product review. You can also read our guide on crossword clue digging tool.
| Terrain | First Choice | Second Choice |
|---|---|---|
| Rocky ground | Thin, strong root digger | Serrated hori-hori |
| Soft loam | Slim trowel | Three-prong cultivator |
| Heavy clay | Long-tine cultivator | Channel-digging implement |
| Leaf-covered ridges | Pointed probe digger | Hori-hori |
When the soil has set up hard, the hard-ground strategy explains why scoring and breaking soil into blocks works better than forcing a blade straight down.
Choosing a Digging Tool That Fits: Handle, Steel, and Shape
The brand matters less than the fit. A tool that twists in your hand is dangerous on a hillside, and a blade too wide to fit into a root seam is worse than no blade at all. You can also read our guide on how to maintain garden digging tools.
Pay attention to the handle first. A full tang runs through the handle and gives you better leverage. A wrapped or contoured grip stays secure in muddy hands, while a smooth round handle can roll when you need control most.
Steel choice matters too:
- High-carbon steel: takes a sharper edge and holds it longer, but rusts easily. It needs regular oiling.
- Stainless steel: resists rust and is easier to clean, but it is harder to sharpen in the field.
- Coated high-carbon steel: a good compromise for most diggers, since the coating slows rust and the edge stays sharp.
Blade shape is about the job. A spear-point blade is better for probing and slicing. A blunt-nose blade is better for prying without cutting into the root. You want enough length to reach depth, but enough narrowness to work in tight spots.
If you want to see how the two best-known digging blades compare for field work, the popular metal-detector tool comparison covers handle length, blade thickness, and prying feel.
Field Technique: The Wide-Then-Deep Method
The goal is to free the root, not to chase it. Dig wide first, then work deep. Here is the step-by-step flow that keeps roots intact:
Probe the circle. Using the pointed digger, probe 6 to 10 inches out from the stem in an expanding spiral. The neck is often deeper than it looks, and this step tells you where the root actually starts.
Clear the collar. Brush away leaf litter and duff around the base of the stem so you can see the crown. Do not dig straight down on top of it.
Open a crescent trench. Dig a crescent-shaped trench on the downhill side of the plant. If you are working in loose ground, a channel-digging implement can open this trench faster than a narrow root digger. The trench gives you room to work and directs water away from the root.
Work from the side. Do not stab at the root from above. Expose the shoulder of the root first, then work down alongside it.
Pry, don’t yank. Place the digger blade under the root and lift slowly. Let the tool take the weight. Force is the enemy of a clean root.
Follow the neck with light cuts. Use the hori-hori to track the neck downward with short, gentle slicing strokes. Let the tool walk along the root rather than into it.
Brush and inspect. Before the final lift, clear enough soil to see the full shape of the root. If it is still held fast, move more soil before you pull.
Close the hole. Plant the ripe berries, replace the soil, and scatter leaf litter so the site looks natural.
Slow is fast. Five calm minutes with the right ginseng digging tools beats a rushed, broken root every time. A common mistake is rushing the trench stage — diggers get impatient, start prying too early, and snap the neck clean off.
Handling the Root After It Comes Free
Once the root is free, the work is not done. Resist the urge to wash it in a stream. Water causes rot and makes the root harder to grade later.
Instead:
- Leave a light coating of soil on the root to protect the hair roots.
- Place the root flat in a breathable paper or mesh bag.
- Keep the bag in the shade, not in a hot vehicle.
- Do not overcrowd the bag with fresh roots.
- Mark the patch on your offline map so you can check on it in future seasons.
A root that stays cool and dry from hole to home keeps more of its value.
Practice Before the Season
The best time to learn is not in the woods. Plant a row of carrots or parsnips in loose soil and practice finding, exposing, and lifting a long taproot without cutting it. Carrots mimic the neck-and-body shape of ginseng well enough to build the right instincts. If you use a managed bed for practice, the bed preparation guide reinforces the same careful approach.
Practice these three moves until they feel automatic:
- Probing outward from the stem before you dig.
- Opening a side trench before touching the root.
- Lifting from below rather than pulling from above.
By the time the season opens, the wide-then-deep method should feel normal.
Troubleshooting Common Field Problems
Even with good tools, things go wrong. Here is how to fix the most common issues:
The root snaps at the neck. You started too close. Increase your probing circle by several inches and move more soil before you attempt any lift.
Heavy clay holds the root tight. Do not fight the whole mass at once. Score vertical cuts with the hori-hori around the perimeter, break the soil into blocks, and remove them one at a time.
A rock shelf blocks your angle. Open a second trench on the uphill side and work from both directions. A root on a ledge needs to be lifted out, not yanked sideways.
The root keeps slipping out of your hand. Clear the soil with a soft brush before you pull. Once the root is exposed, it will not slide.
You cannot find the neck at all. Probe in a spiral pattern moving outward from the stem. Many diggers give up a few inches before the neck actually begins.
Good ginseng digging tools give you options. Change your angle, not your goal.
Terrain, Seasonal Timing, and Regional Differences
Root shape and digging difficulty change with the season and the soil.
| Season | Soil Condition | Tool Emphasis |
|---|---|---|
| Spring (where legal) | Wet and soft | Slim trowel and light digger |
| Summer | Dry and packed | Strong digger and cultivator |
| Fall | Prime season, variable soil | Full kit: root digger, hori-hori, cultivator |
| Winter | Frozen soil | Avoid digging; frost damages roots |
Dry spells make roots more brittle and soil tighter. Bring a cultivator to loosen the ring around the plant first, and expect to spend more time prying than slicing. After rain, the soil softens and roots are more pliable, but soft ground creates false confidence — rush it and you will still break roots.
Region matters too. On rocky Appalachian slopes, ginseng often grows shorter and more contorted. In deeper Midwestern loam, roots can run longer and straighter. Match your blade length to the typical depth and shape of the roots in your area.
Tool Care, Packing, and Field Maintenance
Sharp, clean tools work better and last longer. Dirt holds moisture and salts, which start rust on unprotected steel. After every trip:
- Rinse each tool to remove clinging soil.
- Dry it completely with a rag.
- Oil the metal edges with mineral oil or camellia oil.
- Inspect handles for cracks, loose fittings, and splinters.
Keep a small field kit in your pack: a pocket stone, a rag, and a tiny bottle of oil. A dull blade is a dangerous blade — it slides instead of cutting, which is exactly how roots get gouged.
Store tools in a dry place, not in a damp garage or shed. Wrap sharp blades in cardboard sleeves or leather sheaths before packing so they do not chew through your bag. The same care applies to the workhorse tool you use for larger holes around the property.
Safety and Comfort in the Woods
Ticks, heat, and slips end more days than bad tools ever will.
- Wear long sleeves and pants, and tuck pants into socks in tick country.
- Use an EPA-registered bug repellent and check for ticks thoroughly when you come out.
- Carry water, a small first aid kit, a knife, and a whistle.
- Keep a charged phone in a waterproof pouch.
- Tell someone where you are heading and when you expect to return.
When you are actually digging, maintain a stable stance. Keep your knees bent, your weight low, and your fingers clear of the blade. A knee pad makes a long day in steep hollows much easier on your legs.
Budget Options and DIY Diggers
You do not need an expensive kit to start. A good hori-hori and a narrow root digger will take you through your first season. Add a slim trowel and a cultivator as you learn what your local terrain demands.
On a budget, you can shape a narrow digger from an old garden tool. File it slim, keep the edge dull enough that it pries more than it cuts, and attach a comfortable handle. The design goal is leverage, not sharpness.
Whatever you buy or make, fit matters more than brand. Comfort boosts control, and control saves roots. If a handle is too thick or a blade too wide, you will compensate with bad technique and pay for the mistake in broken harvests.
Frequently Asked Questions
What is the best ginseng digging tool for a beginner?
A narrow root digger and a hori-hori knife. They cover the two main jobs — prying and slicing — and both are light enough to control with one hand. Add a slim trowel once you start digging deeper clay.
Can I use a normal garden trowel to dig ginseng?
You can, but it is not ideal. A wide garden trowel makes it hard to follow the root around rocks, and the thick blade often cuts the neck. A slim, pointed digger is much safer.
How do I stop my tools from rusting?
Clean, dry, and oil them after every trip. Store them in a dry place, not a damp shed or garage, and use blade guards to prevent nicks that expose bare metal.
Is it legal to dig ginseng on public land?
Sometimes. Many states allow wild ginseng harvest on certain public lands with a permit and an open season, but national parks and some nature preserves prohibit it entirely. Check with the land manager before you dig.
What is the most common cause of broken roots?
Digging too close to the stem and prying before enough soil has been moved. Start wider, open a trench, and lift from below with a slim tool.
Conclusion
Ginseng digging tools are only half the equation. The other half is patience, preparation, and respect for the land. A well-chosen kit, matched to your terrain, kept sharp and clean, and used with the wide-then-deep method will turn a brute-force dig into a careful lift.
Get your kit ready before the season opens, practice on a carrot, and check the current rules in your state. Do that, and you will break fewer roots, protect the wild patches, and keep the harvest tradition alive for the next generation.