
How To Use Oregon Chainsaw Sharpener: Pro Guide For 2026
A dull chainsaw doesn’t just cut slowly—it’s dangerous. It forces you to push harder, produces fine sawdust instead of clean chips, and dramatically increases the risk of kickback. Learning how to use Oregon chainsaw sharpener tools correctly is one of the most valuable skills any saw owner can develop.
Oregon makes several types of sharpeners: manual file guides, benchtop grinders, cordless handheld units, and the unique PowerSharp system. Each has its place. In this guide, I’ll walk you through all four methods with the exact steps I use in my own workshop, plus the raker maintenance that most people skip. You can also read our guide on how to fix a leaf blower that won t start.
Why Sharpening Matters More Than You Think
A properly sharpened chain cuts faster, requires less effort, and is measurably safer. When cutters are dull, the saw has to work harder, the engine strains, and you naturally push harder into the cut—a leading cause of kickback accidents.
Sharp chains also protect your investment. A dull chain wears out the bar rails faster and puts extra stress on the clutch and drive sprocket. Regular sharpening extends the life of the entire saw, not just the chain itself. For more on maximizing your equipment’s lifespan, it helps to understand how long do chainsaw chains last under different conditions.
Know Your Chain Before You Sharpen
You cannot sharpen a chain correctly without knowing its specifications. The chain pitch—the distance between drive links—determines which file or grinding wheel you need. Using the wrong size is the most common mistake I see.
Finding Your Chain’s File Size
- 1/4″ and 3/8″ low-profile chains use a 5/32″ round file
- .325″ pitch chains use a 3/16″ round file
- 3/8″ and .404″ pitch chains use a 7/32″ round file
You can find the pitch stamped on the bar, usually near the base, or printed on the chain’s packaging. If you’re unsure, Oregon’s website has a chain identification guide that walks you through measuring it yourself.
Critical Angle Settings
Most chains require a top-plate filing angle of 25° to 35°, with 30° being the most common for general crosscutting. The file tilt (downward angle) ranges from 0° to 10° depending on whether you’re using a full-chisel or semi-chisel chain. The side plate angle is typically built into your filing guide, so you don’t need to calculate it manually.
The final piece of the puzzle is the depth gauge, also called a raker. The standard setting is 0.025″ above the cutter’s top plate, but always confirm your specific chain’s spec on the Oregon chart. Getting these angles right is the foundation of using any Oregon sharpener effectively.
Source: oregonproducts.com
Getting Set Up: Safety and Preparation
Before touching a file to steel, take ten minutes to prepare properly. This isn’t optional—it’s what separates a clean sharpening job from a frustrating one.
Tools You Need
- Oregon sharpener of your choice (file guide, grinder, cordless, or PowerSharp)
- Correct round file or grinding wheel for your chain pitch
- Flat file and depth gauge tool for rakers
- Bar clamp or bench vise
- Marker to flag your starting cutter
- Wire brush and bar oil
- Safety glasses, gloves, and hearing protection
Pre-Sharpening Checklist
Clean the chain thoroughly with a brush. Caked-on oil and sawdust will clog files and cause them to skip across the cutter instead of biting into it. Tension the chain so it sits snug against the bar but still moves freely by hand. Secure the bar firmly in a vise or clamp—any movement during filing ruins your angle consistency.
Finally, and this is critical: disconnect the spark plug wire on a gas saw or remove the battery on an electric model. A saw that starts while you’re sharpening it is a trip to the emergency room. The Oregon safety guidelines emphasize this for good reason—it happens more often than you’d think.
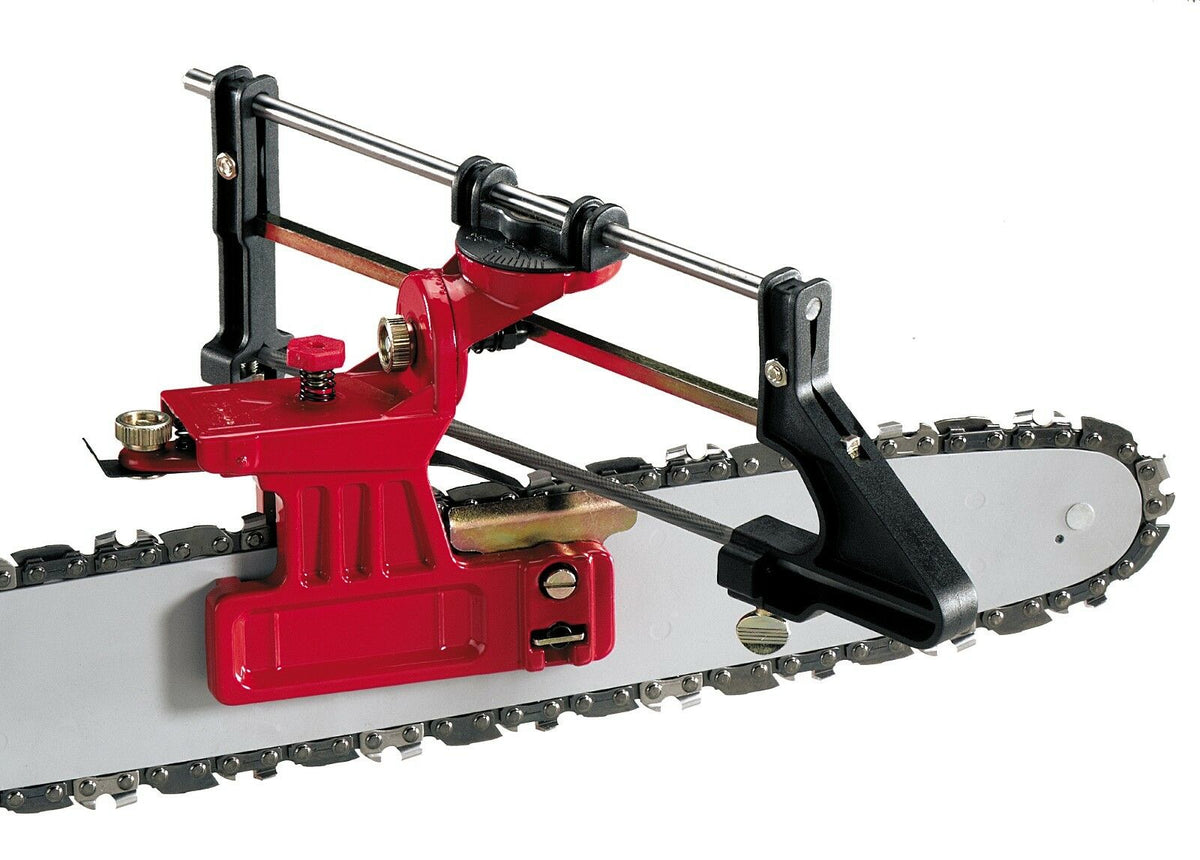
Method 1: Using an Oregon File Guide
The manual file guide is my go-to recommendation for beginners and anyone who sharpens occasionally. It’s inexpensive, portable, and gives repeatable angles without any power source.
Step-by-Step Process
- Secure the bar in a vise or clamp it to a sturdy workbench.
- Mark your starting cutter with a marker so you know when you’ve gone all the way around.
- Position the guide on the chain. The guide’s angle markings should line up with the cutter’s top plate. Oregon’s guides have preset angles—you just match the guide to the bar.
- File from the inside out. Place the round file in the guide at the marked angle. Keep the file level and push in smooth, steady strokes. Lift the file on the return stroke—dragging it back dulls the file.
- Use consistent stroke counts. This is the secret to even teeth. If you do five strokes on the first cutter, do exactly five on every single one.
- Work your way around. When you reach your marker, switch to the cutters on the opposite side that point the other direction.
- Check for burrs. Run your finger lightly along the cutter’s edge. A burr on the outer edge needs a single light pass with a flat file.
In practice, I do four to six strokes per tooth for a normal sharpening. If the chain is very dull or has been rocked, it might take eight. The key is consistency, not force. Let the file do the work.
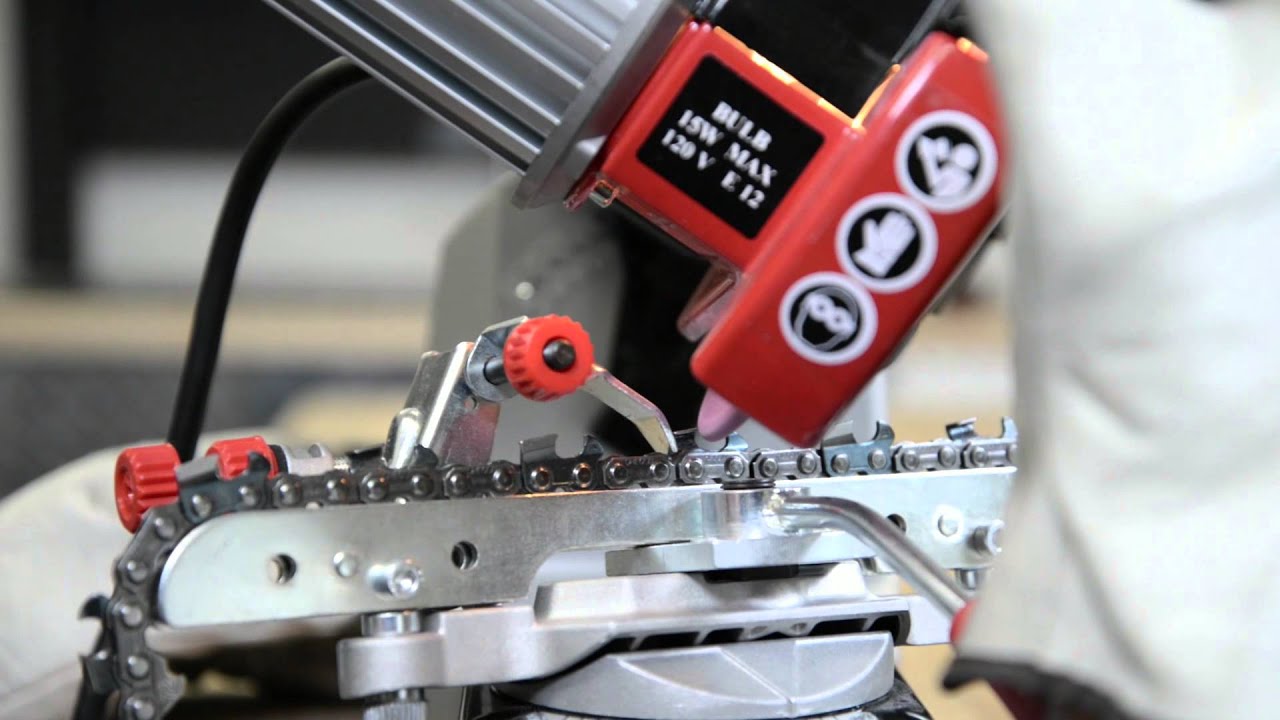
Method 2: Using an Oregon Benchtop Grinder
When you have multiple chains to do, or you’re cleaning up a chain that hit dirt or rocks, a benchtop grinder earns its place on the workbench. It removes more material faster and with more precision than hand filing.
Step-by-Step Process
- Choose the correct wheel. Match the grinding wheel diameter to your chain’s pitch (the same sizes as round files). A wheel that’s too large can’t reach into the cutter properly.
- Dress the wheel. Use a wheel dresser to true up the face. A clean, flat wheel makes consistent cuts and runs cooler.
- Set the vise angle. Rotate the vise to your chain’s top-plate angle (usually 25° to 35°). The grinder’s depth stop controls how much material gets removed—set it so the wheel just kisses the cutter without digging in.
- Mark your starting tooth. If one tooth is visibly shorter or damaged, start with that one—it sets the minimum for everyone else.
- Do light passes. Touch the wheel to the cutter for one to two seconds. If the steel turns blue, you’ve overheated it and destroyed the temper. The edge will sharpen up but dull again almost immediately.
- Grind all cutters on one side, then flip the vise angle and do the opposite side.
- Deburr and oil. A quick pass with a flat file removes the burr, and a drop of oil protects the fresh edge.
My biggest lesson here: two light passes always beat one heavy pass. I rushed a grind once and blued three cutters. The chain cut for about ten minutes before going dull again. Patience saves time in the long run.
Source: archerplus.com
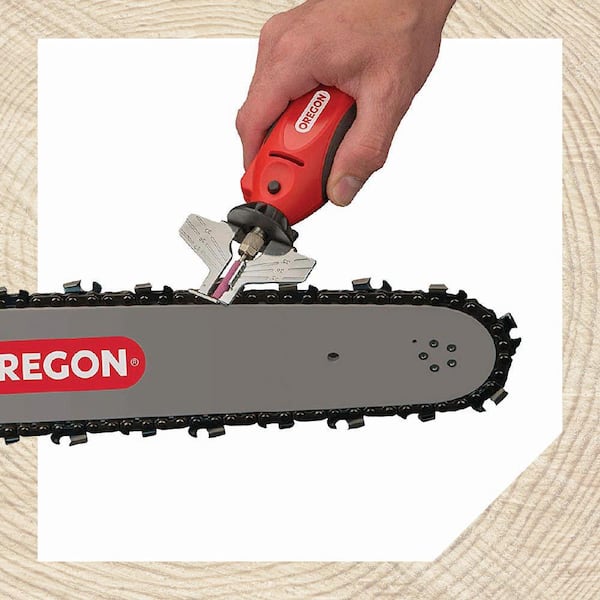
Method 3: Using an Oregon 12V or Cordless Sharpener
This is the field tool. When you’re on a storm cleanup or deep in the woods, the cordless sharpener lets you touch up a chain in minutes without hauling the saw back to the truck.
Step-by-Step Process
- Select the right stone size for your chain pitch. These sharpeners accept standard round stones that you can swap in seconds.
- Set the angle guide. Most Oregon cordless models have a built-in guide that rests on the bar. Align it with the cutter’s top plate angle.
- Use short bursts. Touch the spinning stone to the cutter in quick, light passes. The motor slows noticeably under load—if you’re leaning into it, you’re removing too much metal.
- Count your passes. Same rule as hand filing: consistent counts per tooth keep the chain even.
- Clear the dust. The grinding debris builds up fast and hides what you’re doing. Stop every few teeth and brush it away.
- Work one side, then the other. The guide gives you the correct angle on both cutters.
A practical tip from field use: keep a spare stone in your kit. Sharpening dirty, gritty chains wears stones down noticeably faster than bench work. Having a backup means you’re never stuck mid-job with a glazed stone.

Source: amazon.com
Method 4: Using Oregon PowerSharp
PowerSharp is the fastest sharpening system Oregon makes, and it’s a different beast entirely. It uses a special bar-and-chain combo with a grinding stone mounted on the bar’s nose. You sharpen by running the saw at full throttle and pressing the nose into the stone.
Step-by-Step Process
- Install the PowerSharp bar and chain. The stone mounts on the nose of the bar and the chain routes around it.
- Secure the saw. Clamp the bar in a vise or rest it on a stable surface where you have full control.
- Run the saw at full throttle.
- Press the nose into the stone for three to five seconds. The cutters grind themselves uniformly as they pass over the stone.
- Release and test. Make a test cut in clean wood. If it still feels dull, give it another pass.
- Repeat as needed. The stone wears down over time and is replaceable.
PowerSharp doesn’t produce the finest edge a bench grinder can achieve, but it produces a working edge in under thirty seconds with zero skill required. For homeowners and anyone who uses a saw occasionally, it’s arguably the most foolproof option available. The trade-off is that you’re locked into Oregon’s PowerSharp-specific bar, chain, and stone system.
Source: oregonproducts.com
Setting Depth Gauges: The Most Skipped Step
You can sharpen cutters perfectly and still have a chain that cuts poorly. The culprit is almost always rakers set too high.
Depth gauges control how deep each cutter bites into the wood. Too high, and the cutters barely dig in—you get dust, slow progress, and you have to push hard. Too low, and the chain grabs aggressively, causing chatter and increasing kickback risk.
How to Set Rakers Correctly
- Use a depth gauge tool. It sits over the chain with a slot that the raker protrudes through. Oregon makes an inexpensive one that’s worth owning.
- File what sticks up. With the gauge in place, use a flat file to lower the raker until it’s flush with the top of the tool. A few strokes is usually enough.
- Round the front edge. File the leading edge of the raker at a slight angle so it guides smoothly into the cut.
- Check your spec. The standard setting is 0.025″, but some chains call for 0.020″ or 0.030″. Don’t assume your chain is standard.
When should you do this? Not every sharpening, but every second or third time—or whenever you notice the saw producing fine powder instead of chips. Setting rakers properly turns a mediocre chain into one that self-feeds through the cut.
Source: homedepot.com
Common Sharpening Mistakes and How to Fix Them
Even experienced sharpeners make these mistakes. Here’s what to watch for and how to correct it.
Overheating the Cutters
Blue-tinted steel means you’ve drawn the temper. The edge will be brittle and dull fast. Fix: use lighter passes and let the wheel do the work. If you see color change, stop grinding that side and reassess your pressure.
Wrong File Height
When hand filing, about 20% of the file should sit above the cutter’s top plate. Too high or too low changes the angle you’re actually filing at, even if the guide says otherwise. Fix: check your file position before every few strokes.
Uneven Tooth Length
If your saw pulls to one side, you’ve likely ground one side of the chain more than the other. Fix: start with the shortest or most damaged tooth, use equal strokes across all teeth, and measure with a depth gauge if you’re unsure.
Skipping Raker Maintenance
I’ve seen countless chains that were sharpened regularly but still cut like butter knives. The rakers were too high. Fix: set them every second or third sharpening session.
Using Dull Files
A dull file doesn’t cut—it burnishes. The steel gets polished but not sharpened, and it takes twice as long. Fix: replace your round files regularly. They’re cheap compared to the frustration of fighting a poor edge.

Source: youtube.com
When to Replace the Chain Instead
Sharpening has limits. No amount of filing will fix a chain that’s reached the end of its service life.
Replace the Chain When
- You see cracks in the cutters or drive links
- The cutter length is at or below the wear limit mark stamped on the chain
- Rivets are loose or the chain kinks when you flex it
- You can’t achieve a clean edge after proper filing—the steel is just done
Extending Chain Life Between Sharpenings
- Flip the bar every few sharpenings to distribute wear evenly across the rails
- Dress mushroomed bar rails with a flat file
- Keep the chain properly tensioned both before and after use—a loose chain wears faster and can derail
- Keep the chain clean and lightly oiled when storing the saw
A chain that gets retired at the right time protects your bar, sprocket, and your safety. Pushing a worn chain too far is how bars get scored and kickback incidents happen.
Choosing the Right Sharpener for Your Needs
Not everyone needs a benchtop grinder. Here’s an honest breakdown of which method fits which user.
| Sharpener Type | Best For | Pros | Cons |
|---|---|---|---|
| File Guide | Beginners, occasional users | Cheap, portable, no power needed | Slow for very dull chains |
| Benchtop Grinder | Heavy users, multiple chains | Fast, precise, handles severe damage | Expensive, requires bench space |
| 12V/Cordless | Field work, storm cleanup | Portable, quick touch-ups | Not ideal for major reshaping |
| PowerSharp | Homeowners who want zero fuss | Sharpen in 30 seconds, foolproof | Proprietary system, higher cost |
If you sharpen more than a couple of chains per month, the benchtop grinder pays for itself in time saved. For everyone else, a quality file guide is probably the honest answer. The best sharpener is the one you’ll actually use consistently.
Frequently Asked Questions
How often should I sharpen my chainsaw chain?
Sharpen whenever the saw produces sawdust instead of clean wood chips. For typical firewood cutting, that’s every one to two tanks of fuel. If you’re cutting dirty or previously felled wood, expect to sharpen more often.
What angle should I use for crosscutting firewood?
Thirty degrees on the top plate is the standard for most crosscut chains. Check your chain’s specifications, as some Oregon chains specify 25° or 35° for optimal performance in particular wood types.
Why does my chain cut crooked after sharpening?
One side of the chain has longer or sharper cutters than the other. Re-sharpen both sides with equal stroke counts and verify the angles match. Start with the shortest tooth as your baseline.
Do I need to set rakers every time I sharpen?
No. Check them every second or third sharpening. If the saw produces fine dust even with freshly sharpened cutters, set the rakers sooner.
Is PowerSharp as sharp as a bench grinder edge?
PowerSharp produces a functional working edge quickly. A bench grinder can achieve a finer, more precise edge when done carefully, but PowerSharp wins decisively on speed and ease of use.
Final Thoughts
Sharpening a chainsaw chain is a skill, not a mystery. Match your file or wheel size to the chain pitch, maintain consistent angles, use light passes, set your rakers, and you’ll get a chain that cuts straight and fast every time.
The best approach is the one that fits your situation. A file guide is perfect for most DIY users. A bench grinder is the choice for serious firewood producers. PowerSharp is unbeatable when you want speed without the learning curve. Pick one, practice on a spare chain, and make sharpening a regular part of your saw maintenance routine.
Start with a 15-minute session today. Sharpen one chain using the steps above, track your stroke count, check your rakers, and test it on clean wood. Your saw will feel like a new machine—and you’ll wonder why you put it off so long.


