How To Make A Mini Chainsaw Mill: The Ultimate 2026 Guide
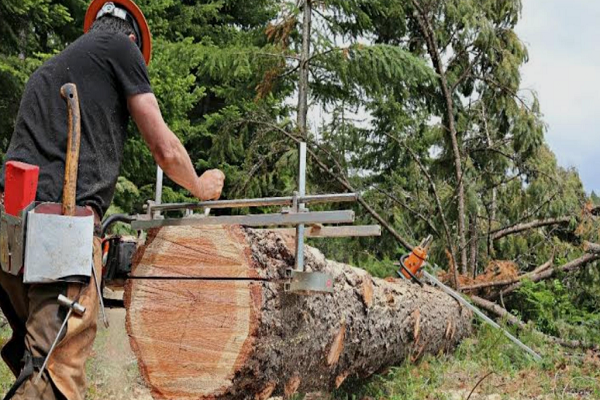
A mini chainsaw mill turns an ordinary chainsaw into a portable sawmill, letting you turn logs into lumber without a massive investment. Whether you need a few slabs for a rustic bench or want to mill small stock for woodworking projects, a homemade mini mill delivers clean results at a fraction of the cost of commercial equipment.
I’ve built and used several mini mills over the years, and the lessons I’ve learned come from real cuts—not theory. This guide walks through the complete build process, the tools and materials you'll need, and the operating techniques that separate straight, clean slabs from wavy, wasted wood. You can also read our guide on how to water lawn efficiently.
Why Build Your Own Mini Chainsaw Mill?
Store-bought chainsaw mills range from roughly $100 for basic models to $500 or more for professional-grade units. A DIY version using aluminum angle, threaded rods, and basic hardware costs a fraction of that—often under $50 if you already have scraps in the shop.
Beyond the cost savings, building your own mill gives you:
- Custom dimensions tailored to your saw bar length and typical log sizes
- Repairability—if a part bends or breaks, you can replace it with off-the-shelf hardware
- Satisfaction of using a tool you built yourself
- Portability—a mini mill weighs just a few pounds and packs easily
The trade-off is time. Expect to spend a solid afternoon on the build. If you'd rather buy ready-made, commercial mini mills work well, but you lose the ability to tune the design to your specific needs. You can also read our guide on how to fix a leaf blower that won t start.
Safety First: Gear and Preparation
Chainsaw milling is more demanding than ordinary cutting. The saw runs at full RPM for extended periods, produces continuous streams of chips, and requires constant attention to kickback zones. Before any build or cut, get your safety protocol in order.
Essential Protective Equipment
- Helmet with face shield—protects against both falling branches and chain debris
- Ear protection—milling generates sustained noise well above safe levels
- Chainsaw chaps or protective trousers
- Heavy-duty work gloves
- Steel-toe boots with good grip
Chainsaw Safety Checks
Before every milling session, verify:
- Chain brake functions properly
- Chain tension is correct (snug against the bar with no sag)
- Chain is sharp—dull chains cause the saw to work harder and produce poor cuts
- Bar oil reservoir is full and oiling mechanism works
- Air filter is clean, as milling creates fine sawdust that clogs filters quickly
If you're new to chainsaw operation, review the claimed power difference between battery and gas models to understand how your saw's characteristics affect milling performance.
Materials and Tools for the Build
Gather everything before you start. Nothing wastes time like discovering you're missing a washer mid-assembly.
Materials List
| Component | Specification | Purpose |
|---|---|---|
| Rails (2 pieces) | 1–1.5" aluminum angle or square tube, 12–24" long | Guide frame that rides on the log |
| Clamp bars (2 pieces) | Flat steel or aluminum, slightly wider than saw bar | Holds the mill to the chainsaw bar |
| U-bolts or carriage bolts (2) | Sized to your bar thickness | Secures clamp bars to the saw bar |
| Threaded rods (4) | 1/4" or 5/16" diameter, 4–6" long | Vertical height adjusters |
| Nuts and washers (16+) | Matching threaded rods | Locks depth settings |
| Wing nuts (4) | For tool-free adjustment | Quick changes between cuts |
| Handle or knob (1) | Any small grip | Steering control |
| Optional extras | Bubble level, ruler sticker, plywood sled | Improves cut accuracy |
Tool Requirements
- Drill or drill press with metal-cutting bits (1/4" and 5/16" minimum)
- Hacksaw, angle grinder, or metal-cutting bandsaw
- Flat file and sandpaper for deburring
- Adjustable wrench or socket set
- Combination square
- Tape measure and permanent marker
- Center punch for accurate hole starts
Material note: Aluminum is a good choice for a first build. It drills easily, cuts quickly with a hacksaw, and keeps the mill light enough to handle comfortably. Steel lasts longer and resists bending, but it's harder to work with and adds significant weight to a tool you'll hold at arm's length.
Design Principles That Make or Break Your Mill
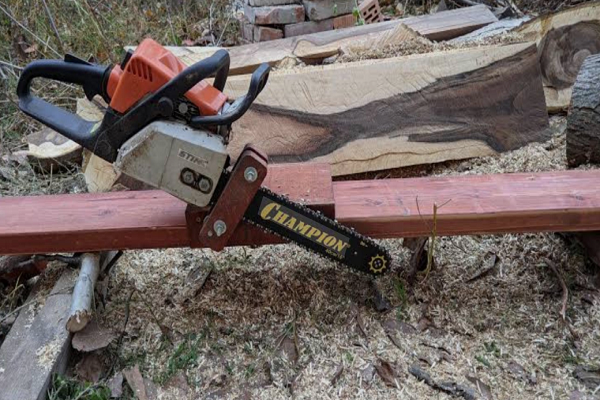
A mini chainsaw mill works by clamping to the saw bar and providing a flat reference surface that rides along the log. Two rails sit on top of the bar, with threaded rods connecting them and setting the cutting depth. The entire assembly slides along the log as the chain cuts.
Key Dimensions
- Rail length: 12–24 inches works well for small logs. Longer rails improve stability but add weight and make the mill harder to control.
- Rail spacing: 4–6 inches between rails provides good stiffness without excessive bulk.
- Height adjustment range: 1.5–3 inches of travel accommodates different slab thicknesses.
- Clamp placement: One clamp near the powerhead, one near the tip—but never over the bar's safety tip zone or blocking oil holes.
The Stiffness Rule
The single most important design principle: the mill must not flex under pressure. If it bends when you push on it on the workbench, it will twist and flex during cutting, producing wavy slabs. Test the frame's rigidity before mounting it to the saw.
A common mistake is making the mill too wide or too heavy, thinking more material means more stability. In practice, the opposite approach works better for a mini mill—keep it narrow, keep it light, and concentrate mass close to the bar where it does the most good.
Step-by-Step: Building Your Mini Chainsaw Mill
Step 1: Measure Your Saw Bar
Before cutting any metal, measure your chainsaw bar's width and thickness. Mark safe clamping zones—the flat section of the bar between the powerhead and the safety tip, avoiding oil holes and the riveted nose area.
Step 2: Cut the Rails
Cut two aluminum angles to your chosen length. Deburr all edges with a file so they slide smoothly along the log without snagging. Square the ends with a combination square—uneven ends make depth adjustment inaccurate.
Step 3: Drill the Rail Ends
Drill matching holes through the rails for the threaded rods. These must be square and centered. Use a drill press if available; freehand drilling often results in angled holes that pull the frame out of alignment when tightened.
Step 4: Install Height Adjusters
Slide threaded rods through the end holes, stacking washers and nuts above and below the rails. These nuts control cutting depth. Tighten the lower nuts to hold the rods in place, then use the upper nuts to fine-tune the rail height relative to the bar.
Step 5: Fabricate the Clamp Bars
Cut two flat bars slightly wider than your chainsaw bar. Drill two holes in each to accommodate the U-bolts or bolts. Position: the saw bar sits between the clamp bars, and the rails sit on top.
Step 6: Align and Drill the Assembly
Place clamp bars under the rails so the saw bar fits between them. Mark where the bolts pass through both clamp bars and rails, then drill matching holes. This alignment step is where precision matters—misaligned holes cause binding and crooked cuts.
Step 7: Dry-Fit on the Saw
Place the mill over your chainsaw bar. Slip the clamp bars beneath the bar and thread the bolts through finger-tight. Verify the chain moves freely without contacting any part of the frame. This test can reveal mismeasurements before you commit to cutting metal further.
Step 8: Square the Rails
Set a combination square against the bar and adjust the rails until they're perfectly parallel. Tighten hardware gradually, checking squareness after each turn. Re-check chain clearance after tightening—clamps can shift the bar slightly.
Step 9: Add the Handle
Bolt a small handle or knob to one side of the front rail. This gives you a second control point and helps maintain a level, steady feed. Position it where it feels natural when you're in a comfortable working stance.
Step 10: Lock Everything Down
Replace standard nuts with nylon lock nuts or add lock washers. Apply a drop of thread locker to critical bolts. Chainsaw vibration is relentless—anything that can loosen will loosen without these precautions.
Step 11: Add a Level and Depth Scale
Stick a small bubble level to the top rail. Mark depth measurements on a threaded rod using a ruler sticker or paint marks. These tiny additions make repeat cuts remarkably easier and are worth the two minutes they take.
Step 12: Final Safety Check and Test Cut
Inspect the chain brake, verify chain sharpness, and confirm the oiler is delivering lubricant. Set the depth for a thin first test cut. Use scrap wood before touching anything you value. If the mill tracks straight on the test log, you're ready. If not, loosen the hardware and re-square the rails.
Setting Up Your First Cut
Milling a round log requires a flat reference surface. The first cut establishes this face, and its accuracy determines the quality of every subsequent slab.
The Straight-Edge Guide Method
- Select a guide: A straight aluminum ladder section, a flat 12-foot plank, or an aluminum beam all work well.
- Attach it to the log: Screw or clamp the guide along the top of the log, running the full length you plan to cut. Check level in both directions.
- Align the mill: Set the mill rails to ride on the guide. Set the cut depth shallow—just enough to skim the high spots from the log's surface.
- Cut slowly and steadily: Maintain full RPM but advance the saw at a controlled pace. Let the chain do the work; forcing the saw creates heat and wavy cuts.
- Keep the kerf open: Insert plastic wedges behind the cut as you progress to prevent the log from pinching the bar.
Flip and repeat: Once you have one flat face, rotate the log so this face is on top. Now the rails can ride directly on the flat surface, and you can set your desired slab thickness.
A common beginner error is skipping the straight-edge first cut entirely and attempting to balance the mill on a round log. You'll fight the log, lose time, and end up with a wavy first slab. Take the extra few minutes—the difference is dramatic.
Operating Tips for Clean, Straight Slabs
Technique That Works
- Run at full throttle—reduced RPM causes the chain to bind and produce rough cuts
- Maintain steady, moderate feed pressure—pushing harder doesn't cut faster; it creates heat and wavy results
- Let the saw's weight do the work—guide the mill rather than forcing it
- Clear chips frequently—milling produces astonishing volumes of sawdust that can clog the bar groove
Managing Bar Pinch and Log Stress
Logs contain internal tension. As you cut deeper, the kerf can close around the bar, causing dangerous kickback or pinching. Insert plastic or wooden wedges into the cut behind the saw as you progress. This simple habit protects both your saw and the quality of your slabs.
Keeping the Chain Sharp
Milling dulls chains faster than any other cutting operation. Bark contains dirt and grit that rapidly wear cutting edges. For serious milling, a ripping chain with a 10-degree top plate angle will produce noticeably smoother cuts and reduce vibration compared to a standard crosscut chain.
Touch up the cutting edges with a file every few cuts, especially when working with dirty or sandy logs. Consider brushing bark off logs before milling, and never let the chain touch the ground.
Maintenance and Storage
After Each Session
- Check every bolt, nut, and clamp for tightness
- Brush sawdust from the rails, clamp bars, and threaded rods
- File any burrs that have formed where rails contact the log
- Wipe down metal surfaces with an oily rag to prevent corrosion
- Drain fuel from the saw if storing for more than a few weeks
Longer-Term Care
Store the mill disassembled or with clamps loosened from the saw bar. Leaving everything tight for extended periods can distort thin aluminum components. Keep the mill in a dry location—humidity will corrode unpainted steel parts quickly.
Troubleshooting Common Milling Problems
Wavy or Rippled Cut Surfaces
Cause: Dull chain, loose frame bolts, or overly aggressive feed pressure.
Fix: Sharpen or replace the chain, methodically tighten every connection, and slow your advance rate. Reduce the depth of cut on the next pass.
Burning Smell or Smoke from the Cut
Cause: Dull chain or insufficient bar oil.
Fix: Sharpen immediately (a hot, sparking chain damages itself and the bar). Check the oil tank and oiling mechanism. Ease up on feed pressure.
Crooked or Angled Slabs
Cause: Rails not parallel to the bar, or a bad first cut.
Fix: Re-square the rails using a combination square. Redo the first cut on a straight guide to re-establish a true reference face.
Chain Pinching or Getting Stuck
Cause: Log stress closing the kerf.
Fix: Use wedges in the cut as you progress. Consider cutting from both ends toward the center. Support the log more effectively to reduce flex.
Rapid Chain Dulling
Cause: Dirt embedded in bark or chain contacting the ground.
Fix: Peel or brush the bark before milling. Keep the bar nose elevated when moving between cuts. Touch up the chain with a file more frequently.
Understanding chainsaw basics like typical chain lifespan helps you plan maintenance intervals before you're mid-cut with a dull blade.
Understanding the Costs
A homemade mini mill is one of the most budget-friendly woodworking tools you can build. Most builders already own the necessary hardware—bolts, nuts, and washers are cheap. The aluminum angle is typically the biggest expense.
| Item | Typical Cost Range |
|---|---|
| Aluminum angle (3–4 feet) | $10–$25 |
| Threaded rods, nuts, washers | $5–$15 |
| U-bolts or carriage bolts | $5–$10 |
| Handle, level, stickers | $5–$10 |
| Total | $25–$60 |
Compare that to commercial mini mills at $100–$300, and the savings become clear. The trade-off is your time and the satisfaction of a custom tool tuned to your saw.
If you're weighing a chainsaw mill against other options, consider whether an electric or gas saw matches your needs—the fuel considerations for lawn equipment apply similarly to chainsaw operation.
Frequently Asked Questions
What size chainsaw works best for milling?
A mid-range saw with 50–60 cc engine displacement handles most small milling tasks well. For hardwoods or wider slabs, you'll want more power. Smaller saws (under 40 cc) struggle with sustained full-throttle milling and overheat quickly.
Do I need a special chain for milling?
A ripping chain with a 10-degree top plate angle significantly improves cut quality and reduces strain on the saw. Standard crosscut chains work but produce rougher surfaces and more vibration. Sharpening a ripping chain with the correct file guide is essential.
How thick should I cut slabs?
For furniture components, 1.5–2 inches allows for joinery and finishing. For bench tops and larger pieces, cut 2–3 inches thick to leave room for flattening and planing.
Can I use steel rails instead of aluminum?
Absolutely. Steel is stronger and resists bending, but it weighs more and takes longer to drill. Aluminum is the better choice for a mini mill where portability matters.
Will this mill fit any chainsaw?
Most standard bars can be accommodated through careful clamp placement. Measure your bar's width and thickness before cutting rails. Avoid clamping over oil holes or the tip safety mechanism.
Why does my mill cut wavy?
Wavy cuts almost always trace back to one of three issues: a dull chain, loose frame hardware, or an unstable first cut surface. Check these in order when troubleshooting.
Final Thoughts
Building a mini chainsaw mill is a genuinely satisfying project that pays for itself on the first log. The skills you'll develop—measuring, drilling, aligning, and tuning—transfer directly to improving the quality of your cuts. Start with scrap metal, take your time on the alignment, and always make a test cut before committing to a valuable piece of wood.
For your next projects, you might also explore hand tool sharpening basics or proper equipment storage and recycling practices to keep your entire workshop in top condition. The same principle applies across all tools: keep things sharp, square, and well-maintained, and they'll serve you well for years.