Homemade Digging Tools: Best DIY Guide For 2026
Homemade digging tools save money, reduce waste, and work well for garden jobs.
If you love building things that last, you’ll enjoy this guide. I’ve spent years testing, fixing, and using homemade digging tools in real yards and beds. You’ll learn what works, what fails, and how to build safer, smarter tools with common parts. By the end, you’ll be ready to make homemade digging tools that fit your hands, your soil, and your budget.

Why build homemade digging tools
Store tools break. Handles snap. Edges dull fast. Homemade digging tools solve those problems because you build them to match your soil and strength. You also save cash and cut waste.
You can tweak weight, balance, and grip. That means less strain and more control. In clay, sand, or rocky ground, a custom edge can be the difference between a slog and a smile.
When you build your own, you learn how to repair. That builds skill and trust in your kit. Homemade digging tools also turn scrap into gold for the yard.
Safety, ergonomics, and design basics
Safety first. A good tool should not fight you. Use gloves and eye protection when cutting or grinding metal. Work in a clear space. Clamp parts before drilling or grinding.
Aim for strong joints. Bolts with lock nuts beat nails. Epoxy helps with wood and metal seats. If you weld, make clean, short beads and let them cool slow.
Design for your body:
- Keep handles about wrist-thick for grip and comfort.
- Shape grips so your thumb rests on a flat.
- Balance the head so it “wants” to bite the soil, not tip.
Research from field tests and extension guides shows that sharp edges reduce effort more than extra weight. So sharpen first, add weight last. That rule has saved my back many times with homemade digging tools.

Materials and tools you already have
You likely own most of what you need. Homemade digging tools do not demand fancy gear.
Good scavenge sources:
- Old mower blades for knife-like tools.
- Worn hoe heads or broken shovels for trenches and edging.
- Rebar and angle iron for forks and stiff spines.
- Hardwood dowels, broken handles, and old tool shafts.
- Hose clamps, U-bolts, and carriage bolts for fast joints.
Basic shop tools:
- Angle grinder with cutoff and flap discs.
- Drill with metal bits.
- Files for fine edge work.
- Epoxy, wood glue, and sandpaper.
- A small vise and clamps.
Nice to have:
- Welder for permanent joints.
- Propane torch for heat shaping.
- Rust-proof paint or boiled linseed oil for wood.
Keep a magnet nearby if you’re unsure about metal type. If it sticks and the steel sparks bright on a grinder, it will likely take a decent edge for homemade digging tools.

DIY builds: step-by-step plans
Below are simple builds I have used for years. Each one takes a few hours or less. Tailor sizes to your soil and reach. These homemade digging tools hold up well if you sharpen and store them dry.
Hand trowel from a steel can and a broken handle
This is fast, cheap, and great for pots or tight beds.
Steps:
- Cut the top and bottom out of a heavy steel can. Split the side seam to make a sheet.
- Sketch a leaf shape about 8 inches long. Cut with tin snips or a cutoff wheel.
- Curve the sheet over a pipe to make a shallow scoop.
- Drill two holes near the base. Screw the scoop onto a short handle or broken tool grip.
- File the edge, then sand smooth. Seal the handle with oil.
- Test in damp soil. Adjust the curve for more lift or bite.
Tip: Double the sheet at the neck for strength. A hose clamp adds even more support.
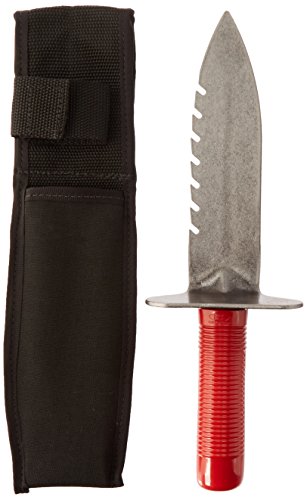
Soil knife (hori-hori inspired) from a mower blade
This is my favorite for roots, dividing clumps, and precise digging.
Steps:
- Mark a 12-inch section on a retired mower blade. Cut and square the ends.
- Grind one long edge to a chisel bevel. Leave a blunt tip if you want a safe point.
- Cut shallow serrations on the other edge for roots and twine.
- Drill two tang holes near the handle end.
- Make scales from hardwood offcuts. Drill to match. Epoxy and bolt them on.
- File the handle flush, sand smooth, and oil. Sharpen the main edge.
Safety note: Keep serrations shallow. They snag less and still cut. This homemade digging tool is tough and holds an edge.
Dibbler and row marker from a dowel and screws
This saves time when you seed rows and set plugs.
Steps:
- Cut a hardwood dowel to 12–16 inches.
- Taper one end with a knife or sander.
- Mark depth lines at 1, 2, and 3 inches. Burn lines with a hot nail for durability.
- For a row marker, drill holes across a spare dowel. Add screws at 6-inch intervals.
- Press the marker across the bed for quick spacing guide.
Use: Press straight in for even holes. This reduces guesswork and keeps plants at the same depth.
Trenching hoe from a worn hoe head and pipe handle
Great for irrigation lines, drip tape runs, and edging beds.
Steps:
- Clean the old hoe head. Grind the edge square.
- If the socket is loose, shim with a steel strap or add a hose clamp.
- Slide a steel or fiberglass handle into the socket. Drill and bolt through.
- Grind a slight convex edge. That keeps it from chipping in rocky soil.
- Paint metal to reduce rust.
Use short chops and pull soil toward you. This homemade digging tool shines in tight trenches.
Rebar broadfork alternative for no-till beds
This is a budget version of a broadfork for aeration.
Steps:
- Cut two side rails from angle iron, about 18–20 inches apart.
- Cut five to seven rebar tines, each 10–12 inches long.
- Drill or weld tines along one rail edge, spaced 4 inches apart.
- Attach two handles made from pipe or hardwood at the ends.
- If you don’t weld, U-bolt tines to the rail and add lock nuts.
- Step on the rail, rock back, and pull to lift and loosen soil.
It will not act like a premium fork, but it will open beds with less soil flip. For homemade digging tools in compacted beds, this is a win.
Root ripper from an old pry bar
Cuts stubborn roots fast without a chainsaw in the dirt.
Steps:
- Grind a narrow, sharp beak on one end of a pry bar.
- File a micro-bevel to reduce rolling.
- Wrap the grip with tape or add a short wooden sleeve.
- Use a stabbing and prying motion to sever roots below grade.
This tool pairs well with the soil knife. Together they make root work simple.
Practical note: Keep edges dull enough to avoid chips in rock. Re-sharpen often. Homemade digging tools work best with sharp but tough edges.
Sharpening, heat treatment, and maintenance
A sharp edge saves energy. File first, then finish with a fine stone. Use a single, steady bevel for knives and a slight convex for hoes and shovels.
For basic hardening on small carbon steel:
- Heat the edge until it turns red-orange.
- Quench in oil for a slower, safer cool.
- Temper in an oven at low heat to reduce brittleness.
If you are not sure of the alloy, skip hardening. Many mower blades are already heat treated. Overheating can ruin them. Tests show that a clean edge and oiling give the biggest gains in tool life for homemade digging tools.
Care tips:
- Wipe dirt right away. Dry tools in open air.
- Oil metal with light oil. Oil wood with linseed oil.
- Touch up edges before storage, not after the next job.

Source: youtube.com
Field tips, mistakes to avoid, and real-world lessons
What I learned the hard way:
- Don’t overbuild. Heavy tools tire you out. Balance first, bulk last.
- Bolts beat screws in metal-to-metal joints. Screws loosen fast with shock.
- A little flex is good. Rigid, brittle parts crack under prying.
Common mistakes:
- Dull edges. A dull edge makes you push harder and lose control.
- Long handles for tight work. Go shorter for small beds or pots.
- No rust control. One wet week can eat a new edge.
Quick wins for homemade digging tools:
- Add a rubber bike grip to reduce shock.
- Paint the top of the handle a bright color. You’ll spot it in tall grass.
- Scribe your name and date. You’ll track wear and tweaks year over year.

Source: psauction.com
Budget and sustainability wins
Most builds cost less than a lunch. You can reuse steel, wood, and hardware. That keeps waste out of the bin and money in your pocket.
Typical savings:
- Soil knife: 5–10 dollars in parts versus 30–60 retail.
- Trenching hoe: under 15 dollars with scrap versus 40–80 retail.
- Broadfork alternative: 25–40 dollars with rebar versus 150–300 retail.
Sustainability notes:
- Reuse hardwood handles. Old tools often hide great wood.
- Choose oil finishes, not thick films, to make repair simple.
- Design for repair. Bolted joints let you swap parts fast.
When you tune and care for homemade digging tools, they can outlast cheap store tools by years.

Frequently Asked Questions of homemade digging tools
Are homemade digging tools strong enough for clay or rocky soil?
Yes, if you choose the right materials and design. Use thicker steel and a convex edge, and keep the tool sharp to reduce shock.
What basic tools do I need to start building?
An angle grinder, a drill, clamps, and a file will do most jobs. Add a vise and epoxy for cleaner builds and safer joints.
How often should I sharpen homemade digging tools?
Touch up after each use for knives and every few uses for hoes and shovels. Short, regular sharpening beats heavy grinding later.
Is welding required for these projects?
No. You can bolt or clamp most joints. Welding helps, but bolted designs work well when built tight.
How do I stop rust on homemade metal tools?
Clean and dry after use, then wipe with a light oil. Store off the ground, and repaint worn areas before rust spreads.
Can I use stainless steel for blades?
You can, but it is harder to grind and may not hold an edge as well without the right alloy. Carbon steel is easier for most DIY builds.
What handle wood works best?
Ash, hickory, or oak offer a strong, springy feel. Seal with linseed oil and sand smooth for comfort.
Conclusion
You do not need pricey gear to dig well. With a few scraps, smart design, and regular care, homemade digging tools can be light, sharp, and tough. Start with one build, test it in your soil, then tweak the grip and edge to fit your hands.
Set a weekend goal: pick one plan, gather parts, and make your first tool. Share your results, ask questions, and keep learning. If you found this helpful, subscribe for more hands-on builds and practical garden fixes.