

How To Change Lawn Mower Oil: Quick Guide For 2026
If your lawn mower is struggling to start, running rough, or smoking more than usual, dirty oil is often the culprit. Learning how to change lawn mower oil is one of the most valuable maintenance skills a homeowner can master. It takes about 20 minutes, costs less than a tank of gas, and can add years to your mower’s life. This guide walks you through the entire process—from gathering supplies to disposing of used oil responsibly—with the kind of practical detail that comes from turning a wrench on dozens of small engines.

Fresh oil keeps internal engine parts lubricated at high operating temperatures.
Source: youtube.com
Why Changing Mower Oil Matters More Than You Think
Engine oil does far more than lubricate. It dissipates heat away from critical components, suspends combustion byproducts, and forms a protective film between metal surfaces moving at thousands of revolutions per minute. Over a season of mowing, that oil gradually breaks down. Heat degrades its viscosity, while microscopic dirt and metal particles accumulate in suspension. For more on this, see our guide on 2 cycle engine oil for lawn mower.
The result? Harder cold starts, increased engine wear, higher operating temperatures, and eventually premature failure. Most manufacturers recommend changing oil every 25 to 50 operating hours or at least once per season—whichever comes first. For a typical homeowner mowing one hour per week through a 20-week season, that means fresh oil each spring.
Consider the economics: a quart of SAE 30 small-engine oil costs around $6, while a replacement walk-behind mower runs $300 to $600 or more. Routine oil changes are the cheapest insurance you can buy for your equipment. If you want to learn more about the correct fluid level for your specific model, check your owner's manual after reading this guide. For more on this, see our guide on best oil for a lawn mower.
Tools and Supplies You'll Need
Gathering everything before you begin keeps the job clean, efficient, and frustration-free. Here's the complete list:
| Item | Purpose | Notes |
|---|---|---|
| Engine oil | Replacement fluid | SAE 30 or 10W-30 for most walk-behinds |
| Oil filter | Contaminant removal | Only for engines equipped with one |
| Drain pan | Catch old oil | At least 2-quart capacity for riders |
| Funnel or flex-spout bottle | Clean refilling | Long-neck design prevents spills |
| Socket or wrench set | Drain plug removal | Metric or SAE depending on engine |
| Shop rags or paper towels | Cleanup | Keep several nearby |
| Oil extractor pump | Optional | Useful for mowers without drain plugs |
| Crush washer | Drain plug seal | Replace if specified in manual |
| Gloves and safety glasses | Personal protection | Hot oil can burn |
| Cardboard or tarp | Floor protection | Catches drips and spills |
My shop tip: invest in a funnel with a flexible, angled spout. It costs under $10 and makes reaching tight fill necks dramatically easier. A bright work light also helps you see the dipstick clearly and spot any drips before they become stains.
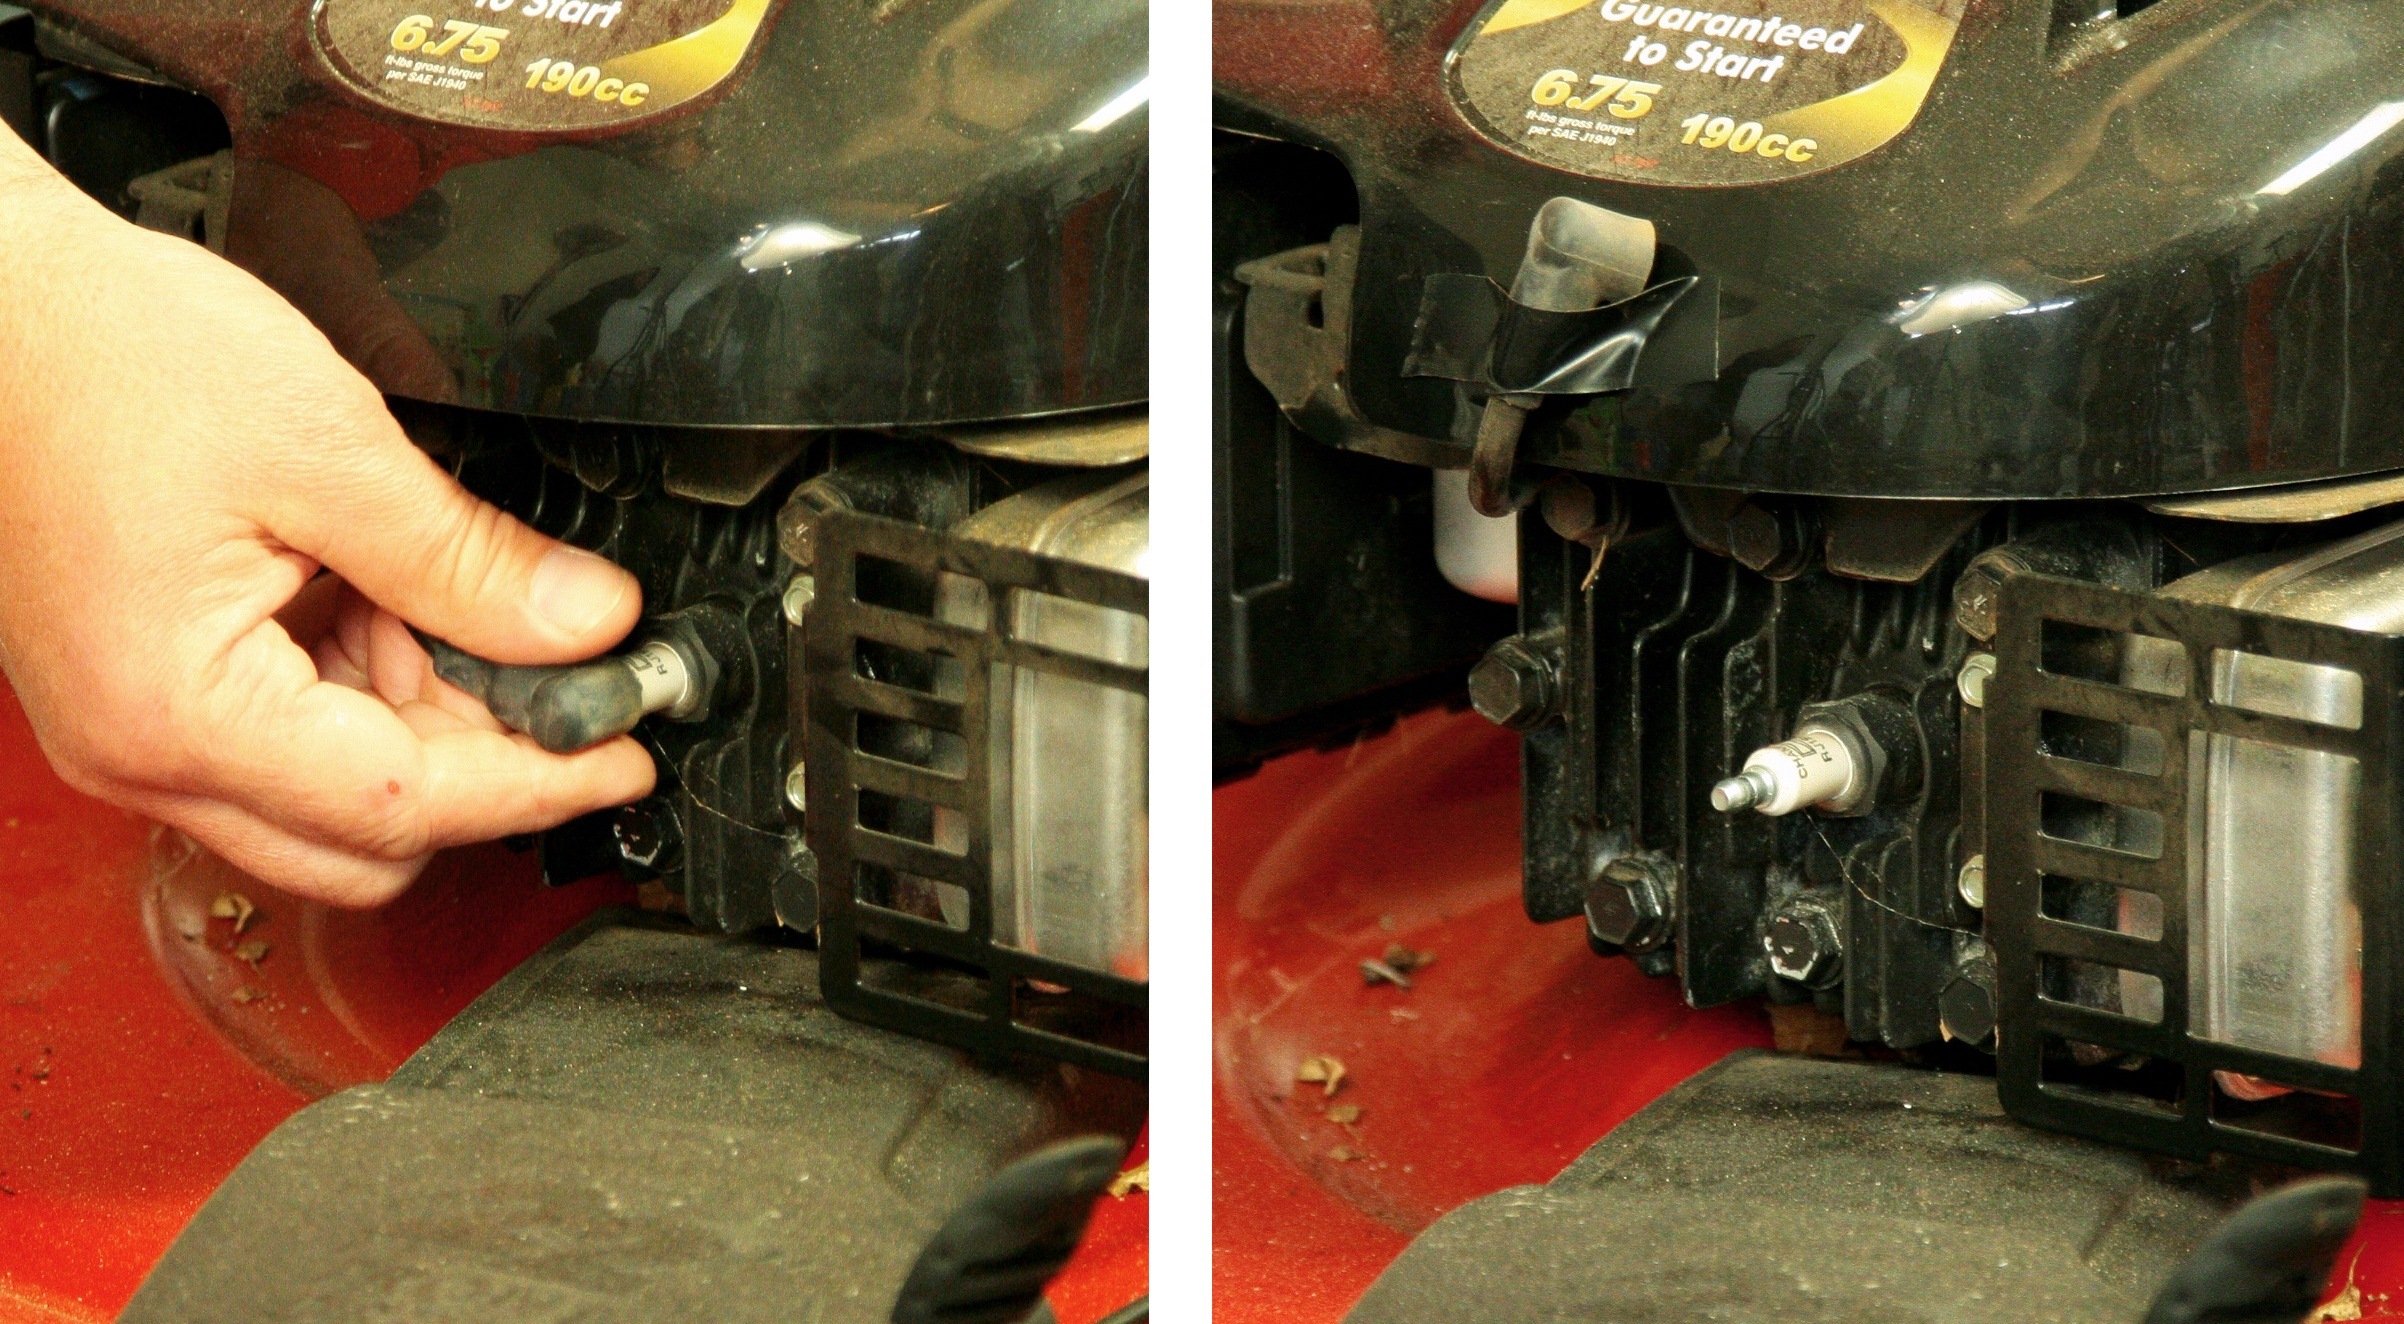
Always disconnect the spark plug wire before any maintenance work.
Source: acehardware.com
Safety Preparation: Do These Steps First
Safety isn't optional when working with hot engines and flammable fluids. Before you touch a single wrench, complete these steps:
Work on a Level, Stable Surface
An uneven surface makes draining unpredictable and can cause the mower to shift unexpectedly. A flat driveway or garage floor works well. Lay down cardboard or a tarp to protect the surface from drips.
Warm the Engine Briefly
Run the engine for two to three minutes before draining. Warm oil flows significantly faster than cold oil and carries more suspended contaminants out with it. But don't overdo it—oil that's too hot can burn your skin and warp drain plug gaskets. Two to three minutes at idle is the sweet spot.
Disconnect the Spark Plug Wire
This prevents accidental starting during maintenance. Always pull the wire from the spark plug itself, not the boot, to avoid damaging the connection. Tuck the wire away from the plug so it can't accidentally reconnect.
Close the Fuel Valve
If your mower has one, shut off the fuel supply before tilting or working on the engine. This prevents fuel from flooding the carburetor or spilling onto hot surfaces. For walk-behind mowers that require tilting, this step is especially critical.
Step-by-Step: How to Change Lawn Mower Oil
Now for the main event. These instructions work for the vast majority of gas-powered walk-behind mowers, riding mowers, and zero-turn mowers. Always consult your owner's manual if it differs from these general guidelines.
Step 1: Position the Mower for Draining
Identify whether your engine has a drain plug or requires tilting. Walk-behind mowers with Briggs & Stratton or Honda engines frequently lack drain plugs and rely on tilting or extraction. Riding mowers almost always have a drain plug, while some newer models feature quick-drain valves that accept a attached hose for mess-free draining.

Locate the drain plug or dipstick tube before beginning the oil change.
Source: instructables.com
Step 2: Drain the Old Oil
Choose the method that fits your mower:
Drain plug method: Position your drain pan directly beneath the plug. Loosen with a wrench, then remove by hand. Let the oil drain completely—this takes several minutes. Inspect the old oil for metal shavings, which can indicate internal wear.
Tilt method: For walk-behinds without drain plugs, tilt the mower onto its side with the dipstick facing up and the air filter side facing down. This positions the fill neck as the lowest point, allowing oil to pour out into your pan. Critical: never tilt toward the carburetor, or oil will flood the air filter and cause the engine to smoke and run poorly.
Extractor method: Insert the pump tube down the dipstick tube until it reaches the oil pan bottom. Pump slowly and steadily until oil stops flowing. This method works well for mowers with awkward access and leaves minimal mess.
Step 3: Replace the Oil Filter (If Equipped)
Many riding mowers and larger engines use a spin-on oil filter. Walk-behind push mowers typically do not. If your engine has one:
- Use an oil filter wrench to loosen and remove the old filter
- Apply a thin coat of fresh oil to the new filter's rubber gasket
- Spin the filter on by hand until snug, then tighten another quarter turn
- Do not over-tighten—the gasket seals easily
Step 4: Reinstall the Drain Plug
Clean the drain plug threads and inspect the washer. If it's flattened, cracked, or crushed, replace it with a new crush washer. Torque the plug to a snug fit—typically 15 to 25 foot-pounds depending on engine. Overtightening can strip aluminum oil pan threads, turning a simple oil change into an expensive repair.
Step 5: Refill with Fresh Oil
Check your owner's manual for exact capacity. Most walk-behind mowers take 15 to 22 ounces, while riding mowers typically need 1 to 2 quarts. Add about 80 percent of the specified amount, then check the dipstick before adding more. Wait 30 seconds after filling to allow oil to settle into the pan.
Step 6: Check the Level and Start
Wipe the dipstick clean, insert it fully, and remove it. The oil level should be at or just below the "Full" mark. Reconnect the spark plug wire, start the engine, and let it run for 30 seconds. This circulates oil through the system and pressures the filter. Shut down, wait a minute, and recheck the level. Top off if necessary.
Step 7: Record the Service
Note the date and hours on your mower's frame with a marker, or keep a maintenance log. This simple habit prevents guesswork about when your next service is due.

Different mower designs require slightly different oil change approaches.
Source: youtube.com
Oil Change Methods by Mower Type
Each mower category has its own quirks. Here's what to watch for:
Walk-Behind Mowers
Most push mowers lack drain plugs, making the tilt or extractor method necessary. The tilt method is fastest: tilt the mower with the dipstick facing up and air filter side up as well, allowing oil to pour from the fill neck. Add oil slowly—15 to 22 ounces fills most models.
Riding Mowers and Lawn Tractors
Riding mowers nearly always have drain plugs, and many have oil filters. A key consideration: replacement requires between 1 and 2 quarts of oil. Position a large drain pan carefully—spills happen quickly when oil flows from a height. If your model has a quick-drain valve, attaching a hose makes collection even cleaner.
Zero-Turn Mowers
Zero-turn mowers often have larger engines with bigger oil capacities and filters. Many use 10W-30, but check your manual for exact specifications. Their accessible underside makes draining easier, but the extra capacity means a larger drain pan is essential. Most zero-turn manufacturers recommend 50-hour change intervals.
Engine Brand Variations
- Briggs & Stratton: SAE 30 for warm weather, 10W-30 for broader temperature ranges
- Honda: 10W-30 is standard; the carburetor side floods easily when tilted wrong
- Kohler: Often uses filters and recommends 10W-30; check torque specifications
- Kawasaki: Similar to Kohler, with filters on most models
Choosing the Right Oil and Capacity
Selecting the correct oil grade affects cold-start reliability, operating temperature, and long-term wear. Here's the breakdown:
SAE 30: Best for consistent warm-weather mowing above 40°F. Thick viscosity provides robust protection at operating temperature and is standard in many small engines.
10W-30: Wider temperature range makes this versatile for spring and fall mowing. Flows better in cooler conditions than single-grade SAE 30.
5W-30 Synthetic: Excellent for cold starts with superior film strength at high temperatures. Worth considering if you mow in cooler weather or use your mower heavily.
15W-50 Synthetic: Reserved for heavy-duty, high-heat applications like commercial zero-turn use. Only use if your manufacturer explicitly approves.
Always use oil specifically formulated for 4-stroke small engines. These formulations include additives that handle the high operating temperatures and steady loads of mowers better than standard automotive oils. Never use 2-stroke oil in a 4-stroke engine—the two are fundamentally different formulations.
For recommendations on choosing the right fuel for your mower as well, our guide on selecting the best gasoline covers the essentials.
Common Mistakes to Avoid
After servicing hundreds of small engines, I've seen the same errors repeated year after year. Avoid these:
- Overfilling: Excess oil causes smoking, rough running, and blown seals. The dipstick is your friend—use it.
- Wrong viscosity: Thick oil causes hard starts in cool weather; thin oil breaks down in extreme heat.
- Tilting incorrectly: Oil flowing into the air filter causes choking, smoke, and rough idle.
- Skipping filter replacement: A clogged filter starves the engine of oil, causing accelerated wear.
- Draining cold oil: Cold oil is thick and leaves sludge behind. Always warm the engine first.
- Reusing crushed washers: A damaged washer invites slow oil leaks that go unnoticed.
- Ignoring disposal regulations: Used oil belongs at a collection point—never in household trash or garden soil.
Each mistake can turn a 20-minute task into an expensive repair bill. Slow down and double-check your work.
Maintenance Schedule and Warning Signs
Track oil changes based on operating hours rather than strictly calendar time:
- First change: After the initial 5 hours on a new engine (breaks in the engine and removes assembly debris)
- Walk-behind mowers: Every 25 to 50 hours of operation
- Riding mowers and zero-turns: Every 50 to 100 hours, typically with filter replacement
- Minimum requirement: At least once per season, regardless of hours
Watch for these signs that oil needs changing sooner:
- Oil appears dark, gritty, or sludgy on the dipstick
- Engine runs louder or hotter than usual
- Starts become progressively harder
- Fuel consumption noticeably increases
If you notice any of these, don't wait for the scheduled interval. Fresh oil is cheap; engine repairs are not.

Blue smoke after an oil change usually indicates overfilling or oil in the air filter.
Source: youtube.com
Troubleshooting After an Oil Change
Even experienced mechanics encounter issues. Here's how to diagnose and fix common problems:
Blue smoke after refill: Almost always overfilling or oil in the air filter. Check the dipstick and drain excess oil if needed. Clean or replace a soaked air filter—they're inexpensive and the replacement takes minutes.
Oil leak at the drain plug: The crush washer is likely missing, damaged, or the plug is undertightened. Replace the washer and snug the plug to the specified torque.
Hard starting after tilting: The carburetor may be flooded from fuel or oil. Let the mower sit for 15 minutes to allow fluid to drain, and replace a contaminated air filter.
Mower surges at idle: Low oil or a dirty air filter often causes this. Verify the oil level and clean or replace the filter if necessary.
Milky or frothy oil: Water contamination is the culprit. Change the oil again immediately, inspect gaskets for leaks, and store your mower in a dry location with the fuel tank full to prevent condensation.
Eco-Friendly Disposal and Cleanup
Used motor oil is classified as hazardous waste by the Environmental Protection Agency. Never pour it down a drain, onto the ground, or into household trash. The EPA's used oil management guidance provides comprehensive disposal information.
Collection options are widespread and usually free:
- Auto parts stores: Most major chains accept used oil for recycling
- Municipal recycling centers: Many offer oil collection bins
- Service stations: Many accept used oil from DIY mechanics
- Curbside hazardous waste pickup: Some municipalities schedule regular collections
Store used oil in a clean, sealed plastic jug with a secure lid. Label it clearly so no one mistakes it for a beverage. Wipe up spills immediately with rags and dispose of saturated rags according to your local hazardous waste guidelines.
Cost and Time Breakdown
This is one of the most economical maintenance tasks in home ownership:
| Item | Estimated Cost |
|---|---|
| Oil for walk-behind mower (15-22 oz) | $5–8 |
| Oil for riding mower (1-2 quarts) | $8–12 |
| Oil filter (when equipped) | $8–15 |
| Crush washer | $1–3 |
| Total typical cost | $10–30 |
Time investment: 15 to 30 minutes with tools ready, plus a few minutes for the engine to warm. This modest investment prevents $300–1,000+ in premature replacement costs.
For more tips on maintaining your outdoor power equipment, our guide on electric mower battery longevity covers battery-powered alternatives.
Frequently Asked Questions
How often should I change mower oil?
Change it at least once per season or every 25 to 50 operating hours for walk-behind mowers. Riding mowers and zero-turns can often go 50 to 100 hours between changes. Always check your owner's manual for manufacturer-specific intervals.
What oil type should I use?
Most small 4-stroke engines use SAE 30 for warm-weather mowing or 10W-30 for broader temperature ranges. Synthetic versions are acceptable if the manufacturer approves. Avoid 2-stroke oil—it's a completely different formulation.
Do all mowers have oil filters?
No. Most walk-behind push mowers don't have filters, relying on regular oil changes instead. Most riding mowers, zero-turns, and larger engines do have filters, and these should be replaced with every oil change.
Can I use car oil in my mower?
Automotive 10W-30 can work if it meets the manufacturer's specifications, but small-engine-specific oil includes additives that better handle heat and steady loads. The difference in cost is minimal, so dedicated small-engine oil is the safer choice.
How do I know if I overfilled the oil?
Blue exhaust smoke, rough idle, and oil visible on the dipstick above the "Full" mark are telltale signs. Drain a small amount to correct the level.
Is synthetic oil worth the extra cost?
Synthetic handles temperature extremes better and provides superior wear protection. However, it doesn't extend oil change intervals—stick to the manufacturer's schedule regardless of oil type.
What if my oil looks milky?
Milky oil indicates water contamination. Change the oil immediately, inspect gaskets and seals for leaks, and store your mower in a dry location to prevent condensation inside the engine.
Conclusion
Changing your lawn mower oil is a straightforward task that delivers outsized rewards: smoother starts, cooler operation, longer engine life, and lower repair costs. The complete process takes under 30 minutes, requires minimal tools, and costs less than $15 for most walk-behind mowers. Warm the engine, drain completely, use the right grade and amount, and track your service hours. Your mower will thank you with reliable performance season after season.
Start with a simple oil change this weekend. Your next mow can feel brand new.


